•
Cembra Mastercard Gold


Capitolo 1
Prima che i clienti possano usare Smart Chip, serve un po’ di preparazione. Devono avere l’app Smart Chip, un account e una carta di credito o di debito compatibile con Smart Chip. In questo capitolo imparerai come configurare tutto.
I clienti dovrebbero scaricare l'app e creare un account prima di venire nel tuo studio. Così risparmierai tempo prezioso.
Importante: prepara il Smart Chip prima di applicarlo sull’unghia. In questo modo, ti accorgerai subito se non funziona e potrai sostituirlo senza alcuno sforzo in più.
Questo è il capitolo 1 del corso di formazione.
Per imparare come applicare il Smart Chip sull'unghia, dai un'occhiata a Capitolo 2.
1.1
Per poter usare il tuo Smart Chip, devi avere un account Smart Chip.
Per aiutarli a prepararsi all'appuntamento, puoi mandare loro questo link: smart-chip.com/preparazione
1.1
Il Smart Chip si gestisce tramite l'app Smart Chip. È disponibile per iOS e Android.


1.1
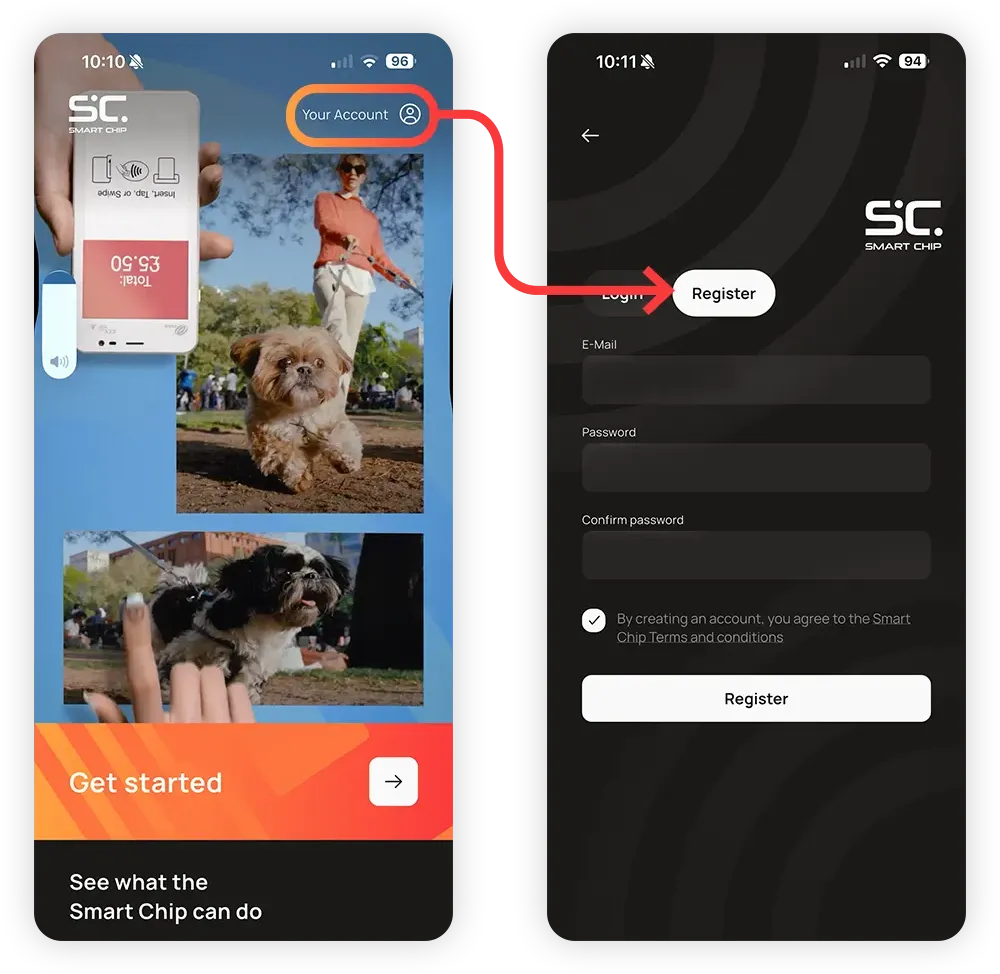
Il modo più veloce per creare un account è toccare Il tuo account in alto a destra, poi Registrati.
1.1
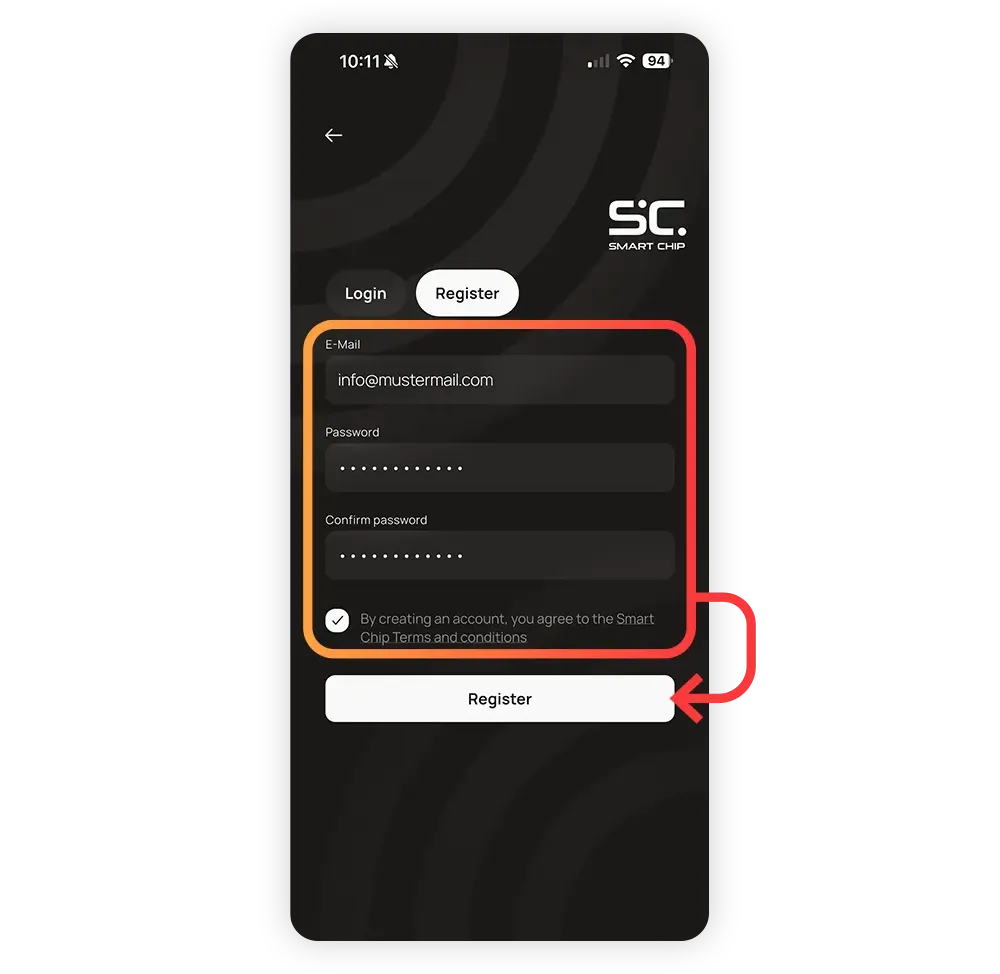
I clienti inseriscono la loro email e la password che preferiscono.
Dopo aver accettato i termini e le condizioni, cliccano su Registrati.
1.1
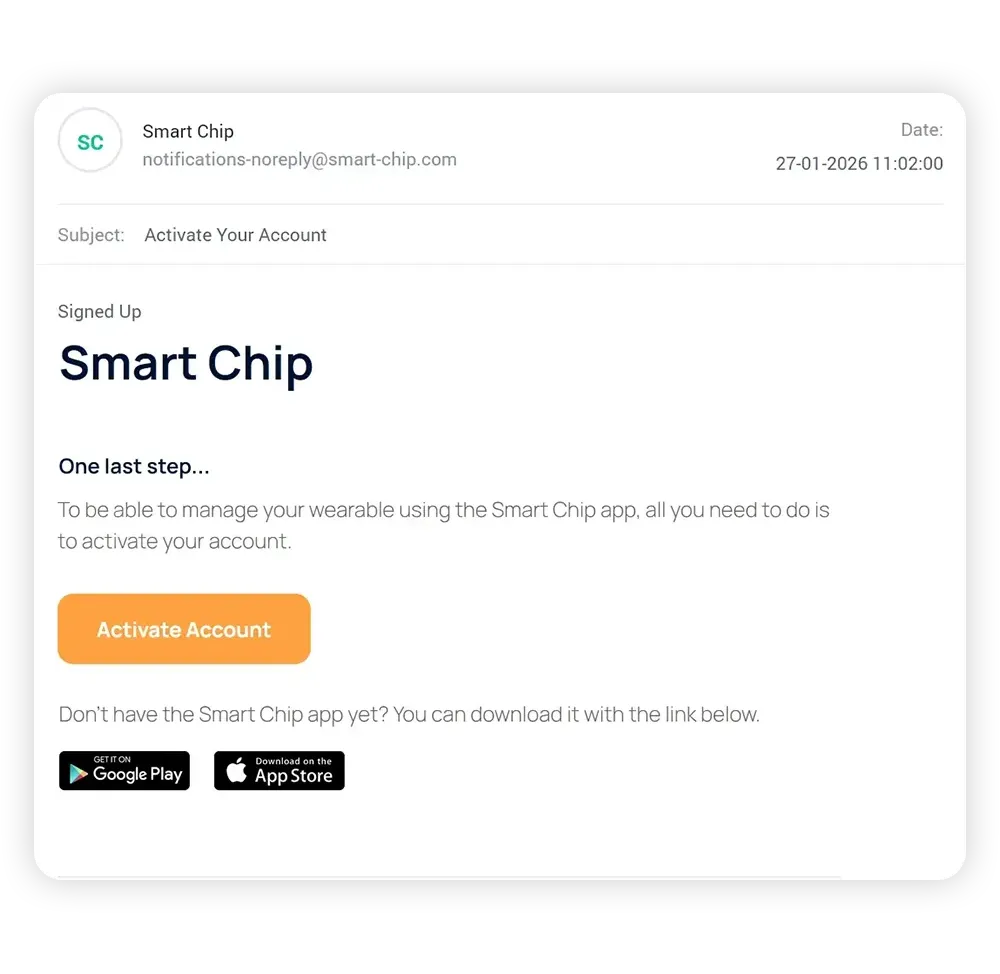
Dopo aver toccato "Registrati", ti verrà inviata un'e-mail all'indirizzo che hai inserito. Si tratta di una misura di sicurezza per contrastare l'uso improprio degli indirizzi e-mail.
Devi aprire l'e-mail e cliccare su Attiva account. L'account è ora pronto per l'uso.
1.1
Tornando all'app Smart Chip, i clienti devono effettuare l'accesso. Devono toccare Accedi o Il tuo account in alto a destra, inserire la tua email e la password, e poi toccare Accedi.
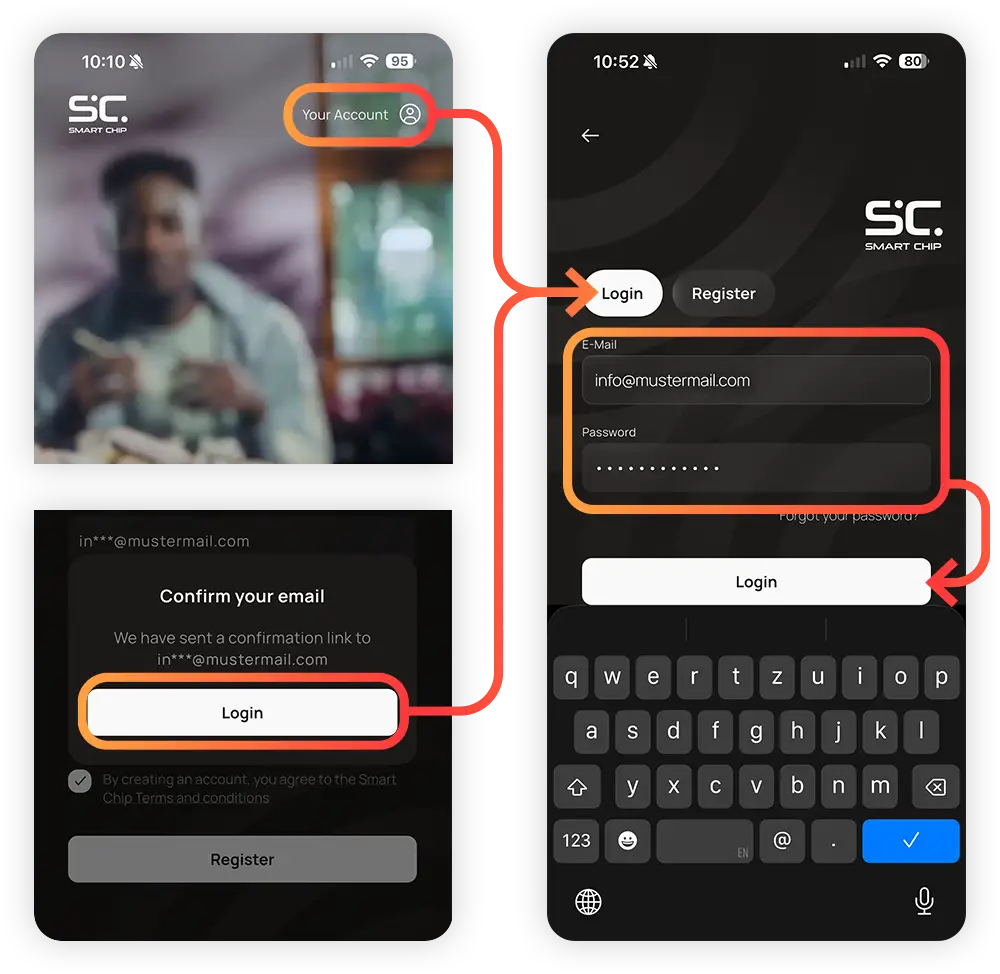
Questi sono tutti i passaggi necessari per creare e attivare un account Smart Chip. Se i clienti vedono questa schermata, significa che sono pronti per attivare il loro primo Smart Chip.
Se hanno domande o problemi, invia loro il link a smart-chip.com/preparazione
e fai notare che, se serve, possono trovare istruzioni più dettagliate al punto 3.
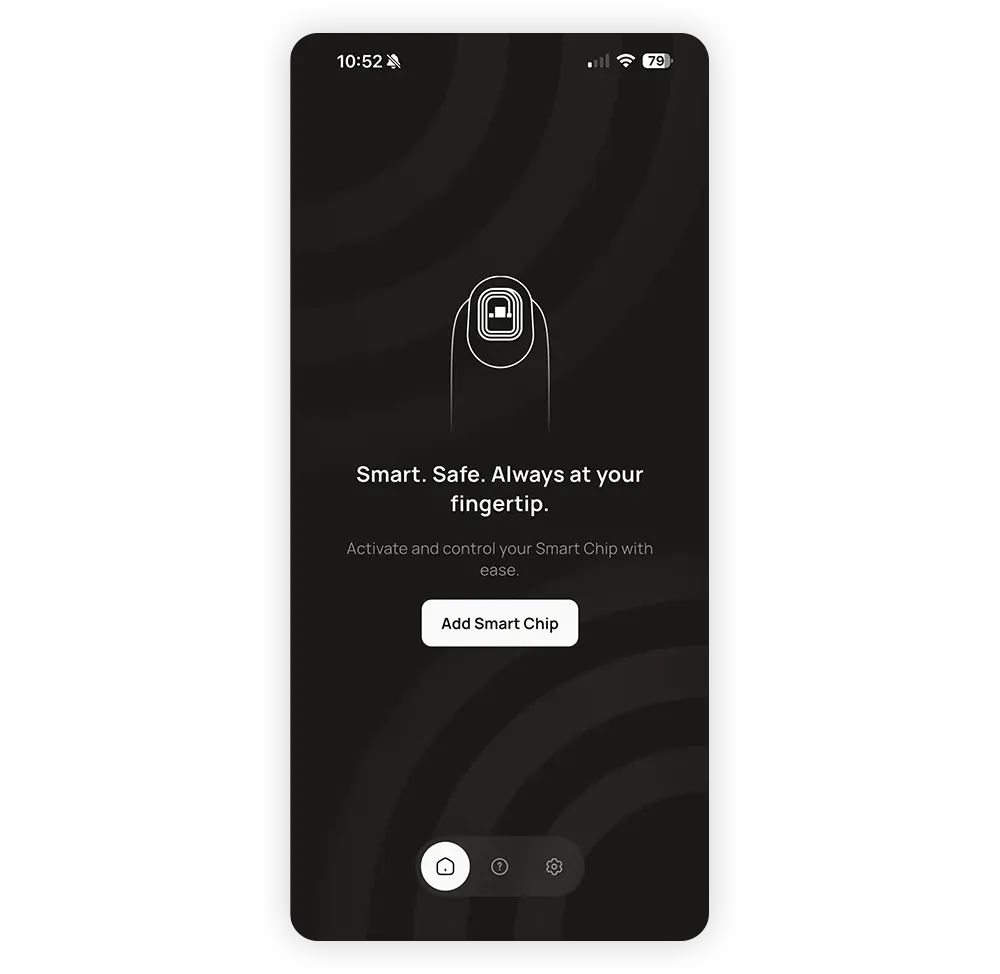
1.2
I passaggi seguenti vengono eseguiti in studio da te o dal cliente.
Molti clienti hanno bisogno di un po’ di aiuto con la configurazione iniziale. Ecco perché è importante che tu capisca bene questi passaggi e che sia in grado di aiutarli a risolvere qualsiasi dubbio possano avere.
1.2
Assicurati che il cliente abbia effettuato l'accesso al proprio account Smart Chip.
Chiedi loro di cliccare su Inizia, poi su Attiva il tuo Smart Chip nella schermata iniziale. Se si ritrovano nella schermata a destra, è tutto a posto. Se invece vengono reindirizzati alla schermata Accedi/Registrati, dovranno effettuare l'accesso o creare un account se non ne hanno già uno. Aiutali con la configurazione se necessario.
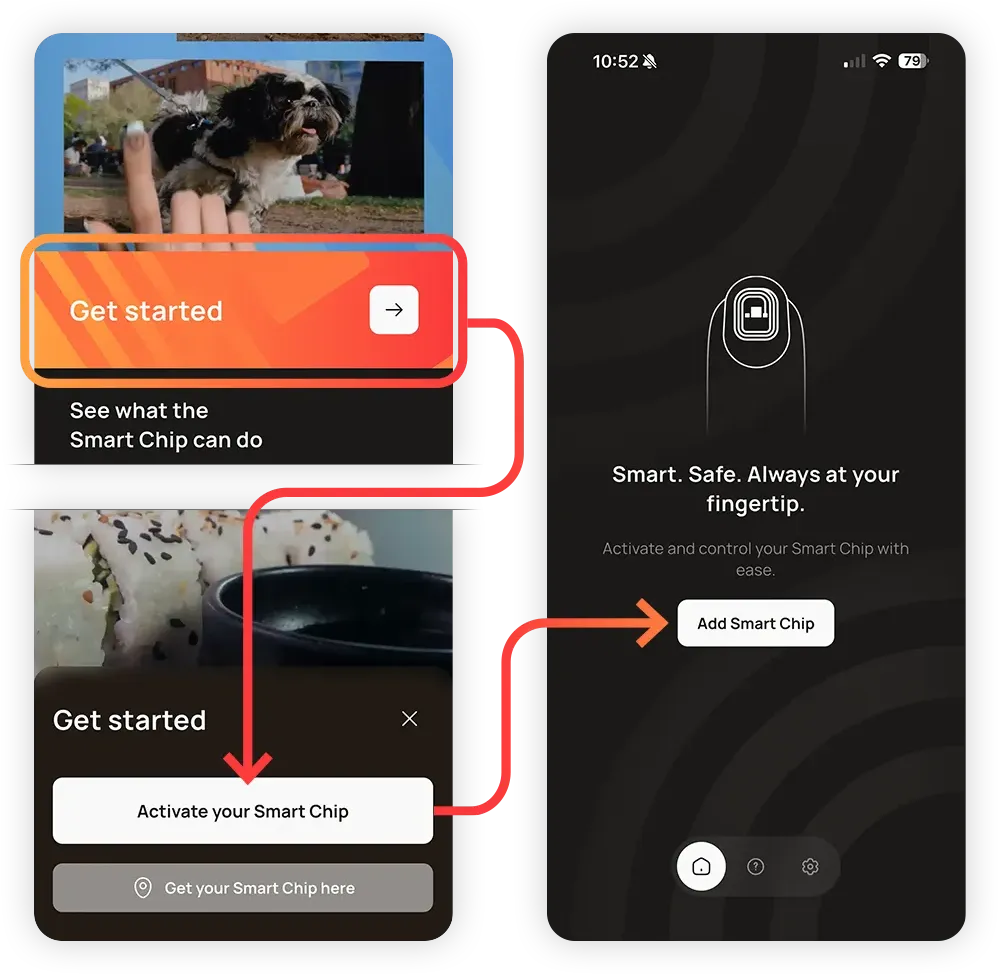
1.2
Adesso attiveremo il Smart Chip del cliente. Fallo prima di fissare il Smart Chip al chiodo. In questo modo puoi sostituire un chip difettoso senza alcuna difficoltà.
Tocca Aggiungi Smart Chip, poi Avanti.
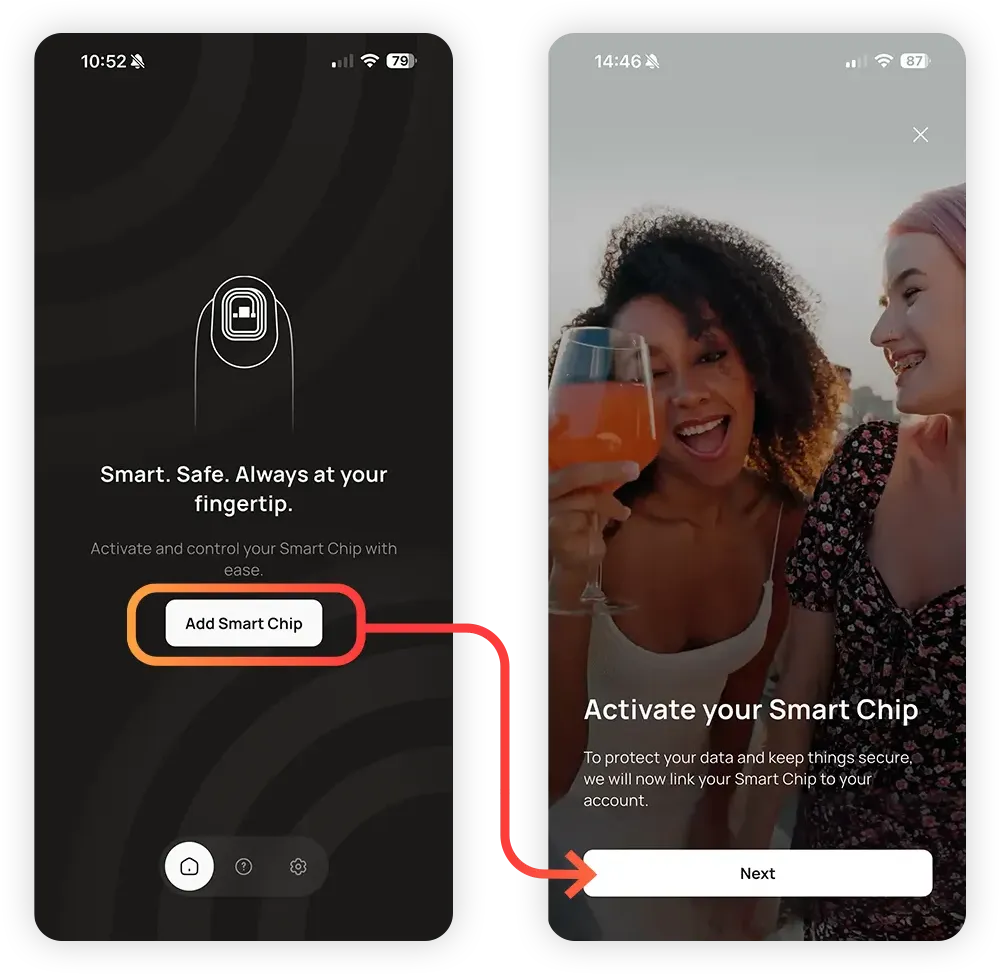
1.2
Il Smart Chip usa il lettore NFC del telefono per connettersi e attivarsi. Per farlo, devi avvicinarlo al lettore.
L'animazione sullo schermo mostra la posizione del lettore a seconda del dispositivo.
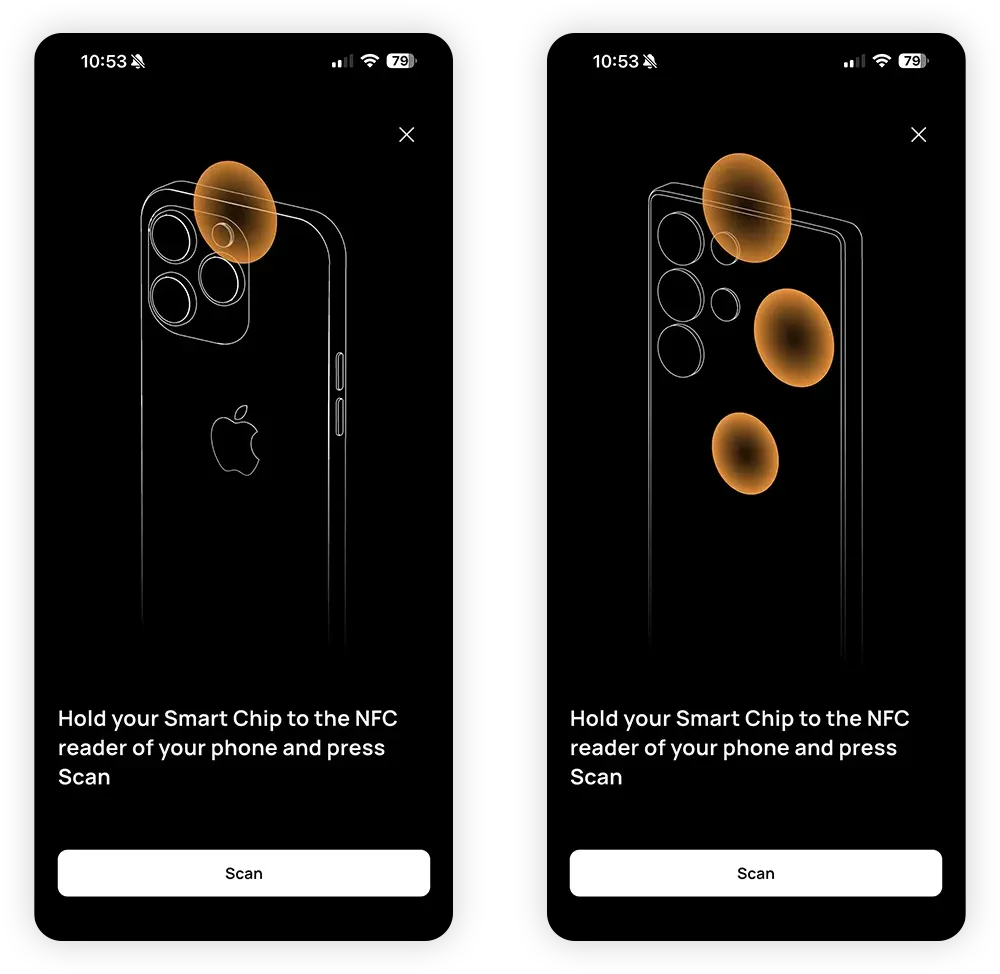
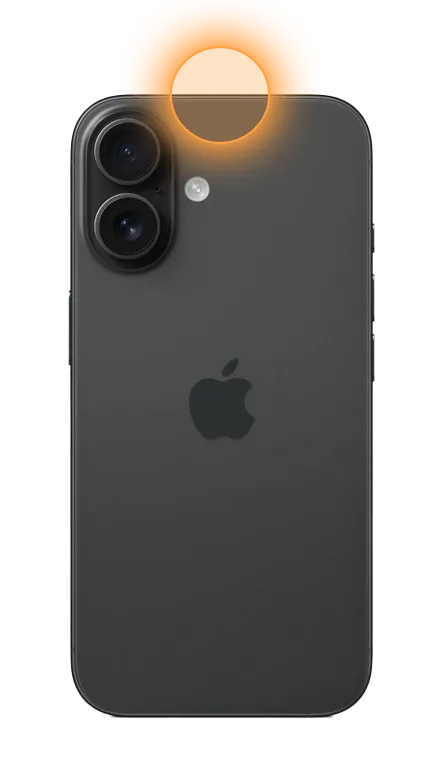
Sui dispositivi Apple, il lettore NFC si trova nella parte superiore del dispositivo.
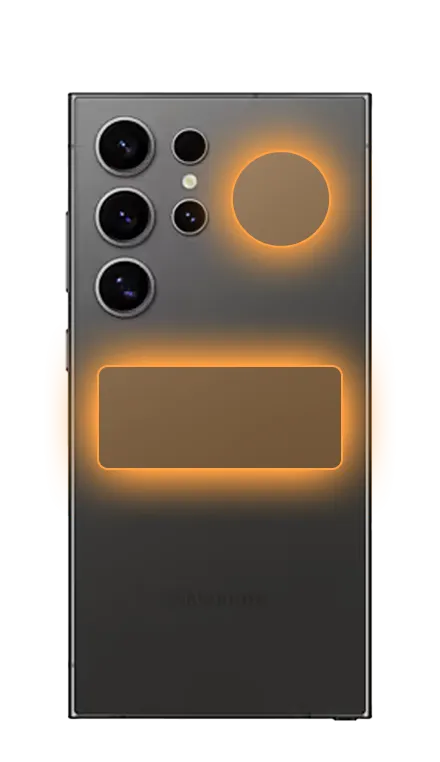
Sui dispositivi Android, il lettore NFC di solito si trova sul retro, vicino alla fotocamera, oppure al centro del dispositivo.
1.2
Tocca Scansiona.
Avvicina il Smart Chip al lettore NFC del telefono. Potrebbe essere necessario spostarlo lentamente finché non trovi la posizione giusta.
Se hai problemi a collegarlo e il telefono ha una custodia più spessa, prova a toglierla.
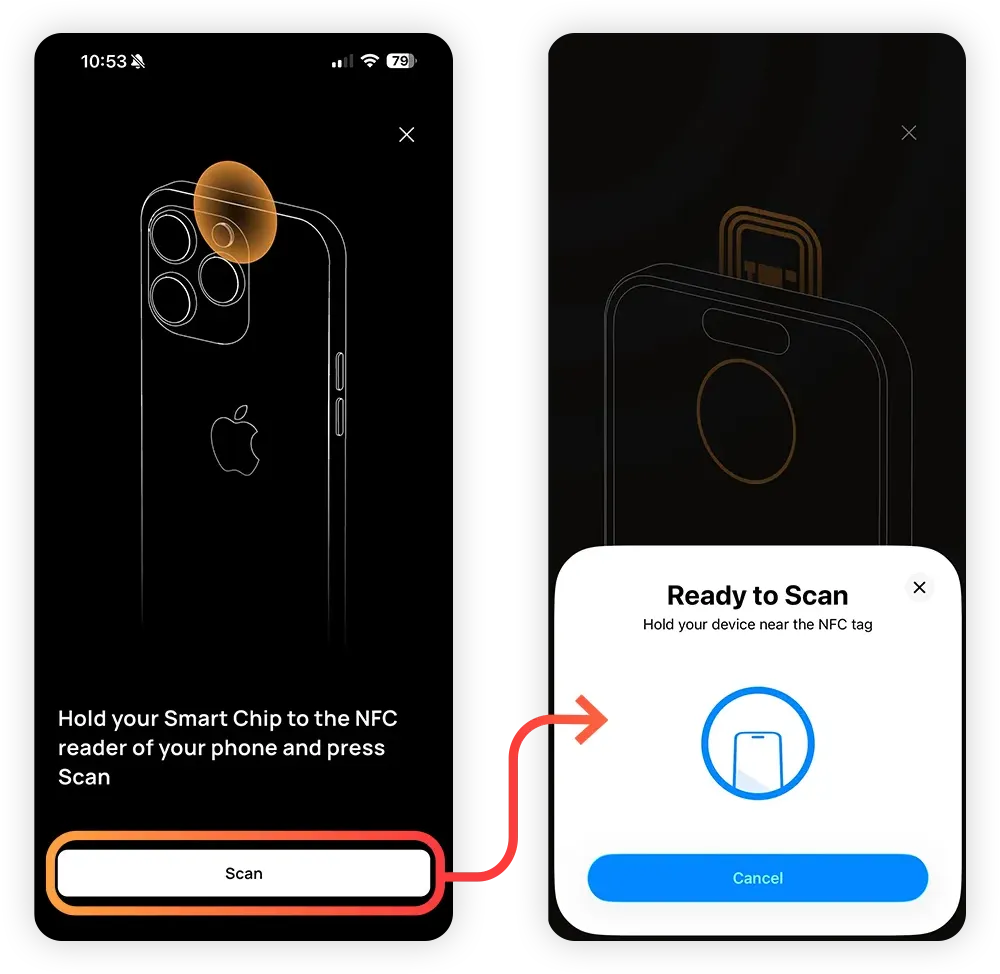
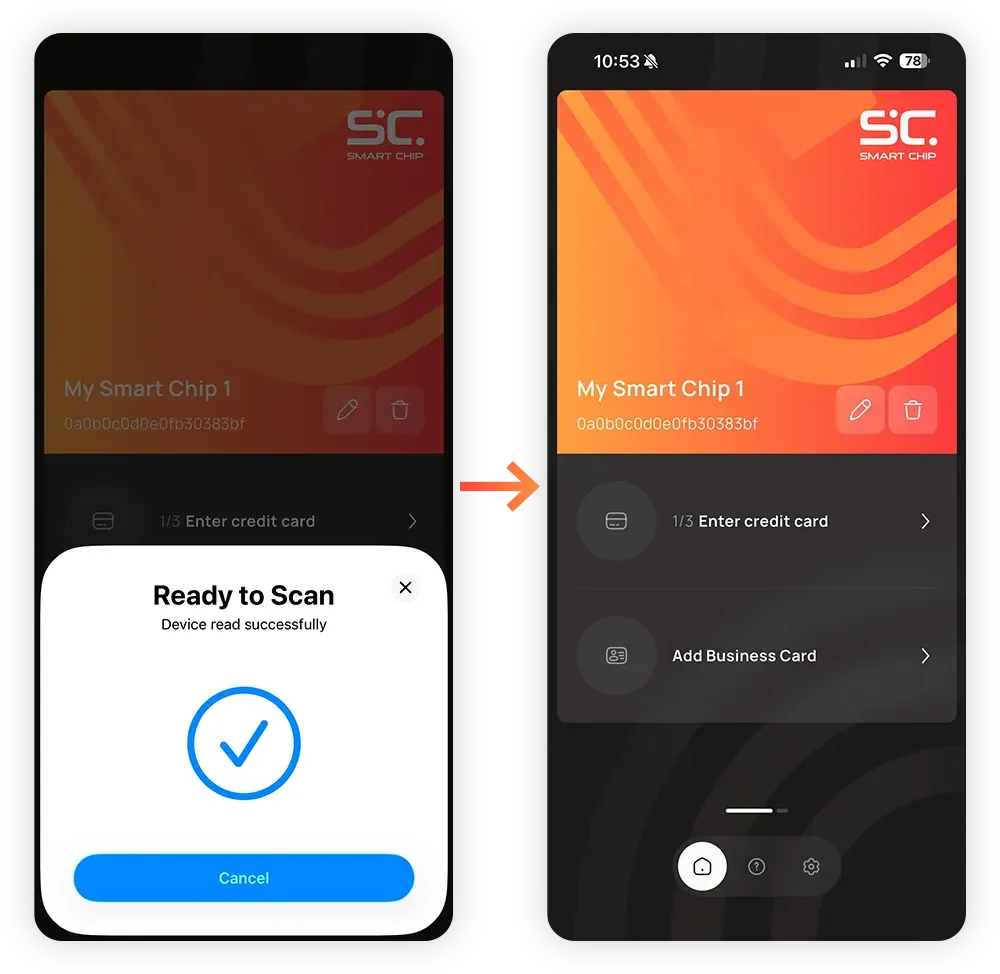
Non appena il Smart Chip viene posizionato nel punto giusto, si collega e verrai reindirizzato alla schermata iniziale.
Il Smart Chip è ora pronto all'uso.
1.3
Stiamo collegando la carta di pagamento del cliente al suo account Smart Chip.
I dati della carta verranno crittografati e inviati a Smart Chip, per poi essere cancellati dall'app. Smart Chip rispetta i più elevati standard di sicurezza per garantire la protezione e la riservatezza di tutti i dati.
1.3
Tocca 1/3 Inserisci i dati della carta di credito, poi Avanti.
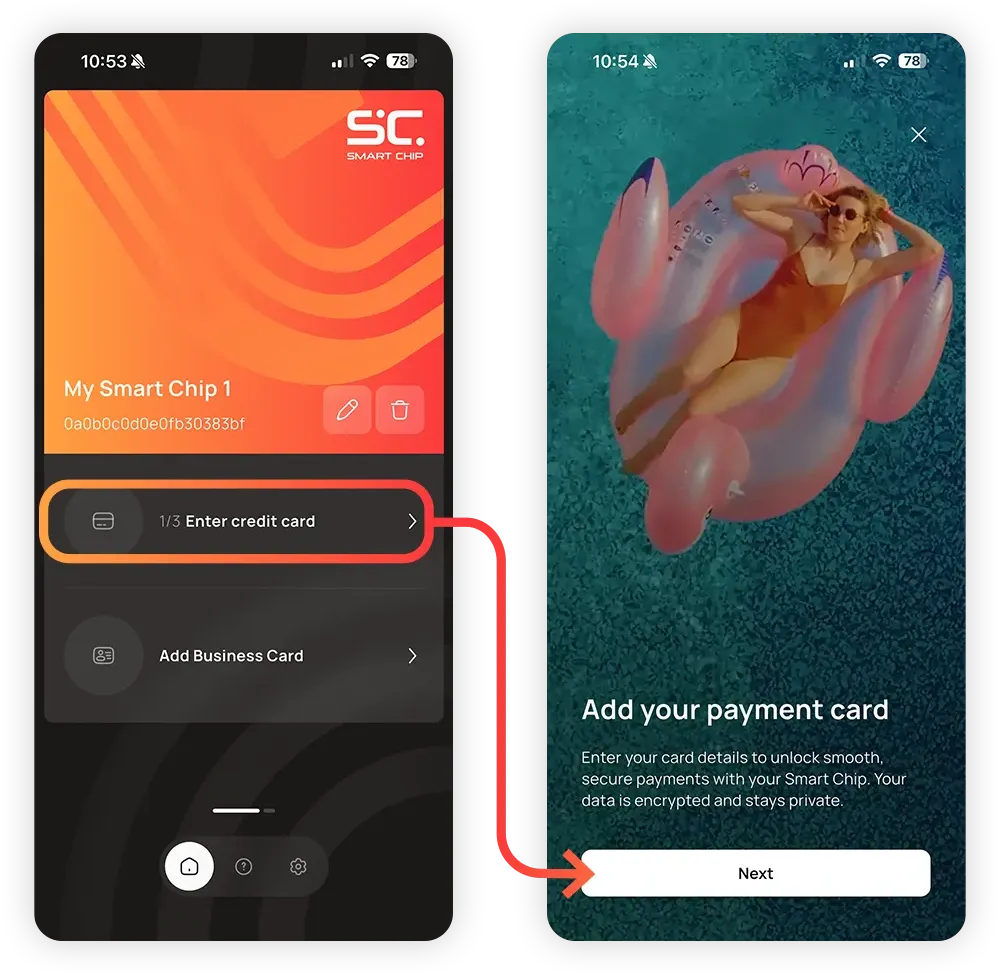
1.3
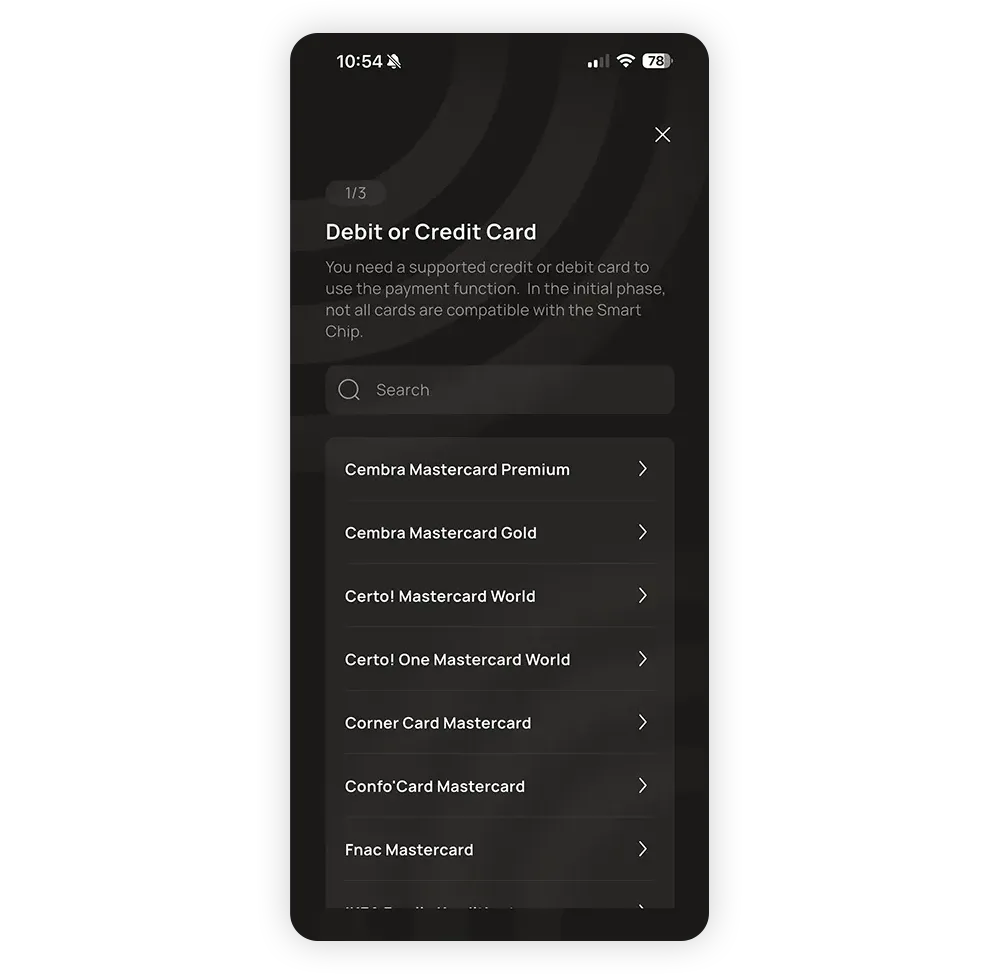
Seleziona la carta del cliente dall'elenco. Se la carta non compare nell'elenco, purtroppo non è ancora supportata.
Cembra Mastercard Gold
Cembra Mastercard Premium
Certo! Mastercard World
Certo! One Mastercard World
Confo’Card Mastercard
Corner Card Mastercard
Curva
Fnac Mastercard
Carta di credito IKEA Family
LIPO Mastercard
PostFinance
SPAR Mastercard World
Swiss Bankers Life Digital
Mastercard per i soci TCS
TCS Travel Mastercard Gold
1.3
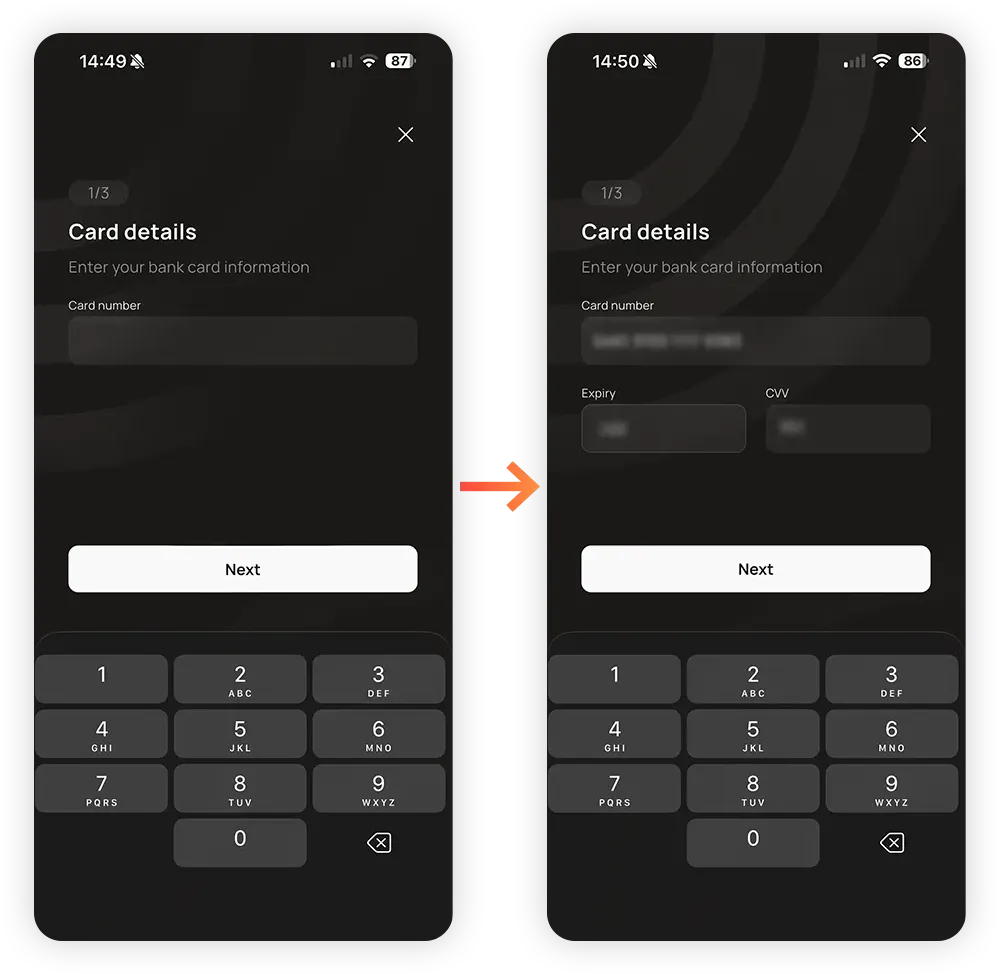
Chiedi al cliente di inserire i dati della carta: Il numero della carta, il data di scadenza e il CVV.
Quando hanno finito, cliccano su Avanti .
1.3
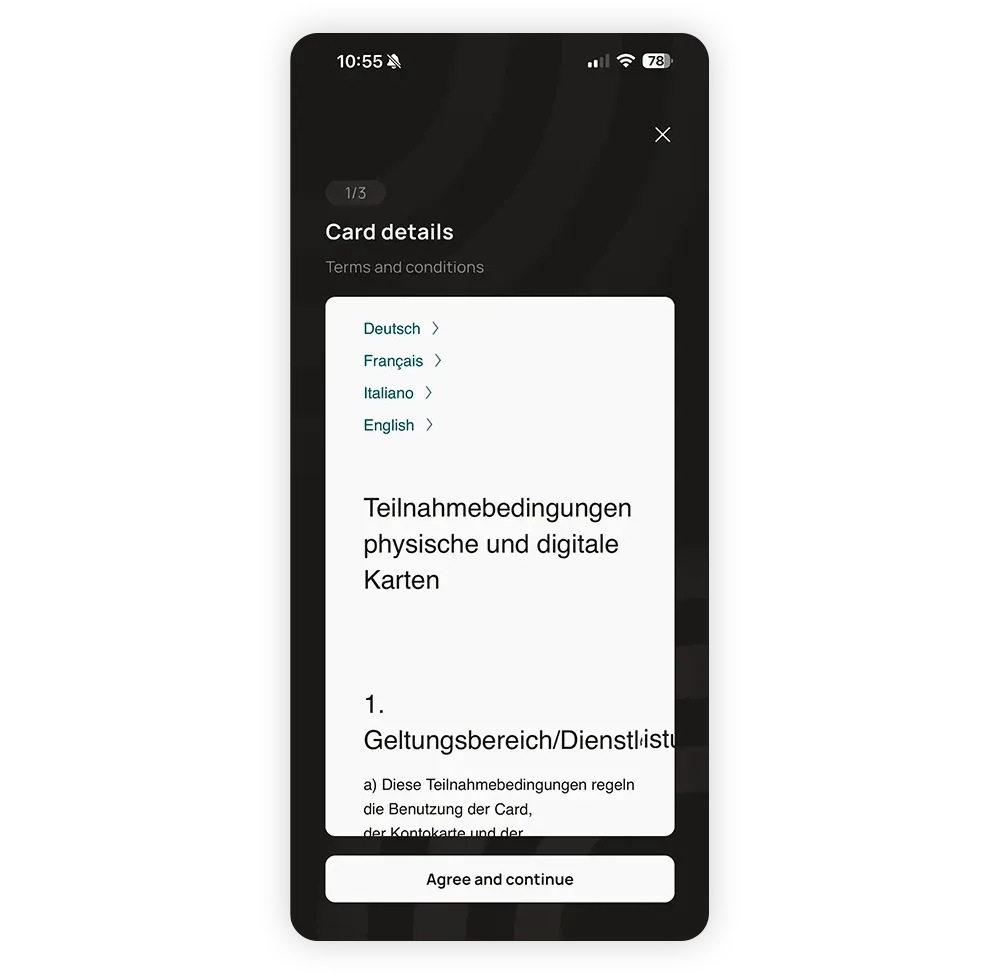
Ti verranno mostrati i termini e le condizioni della tua banca. Se sei d'accordo, tocca Accetta e vai avanti.
1.3
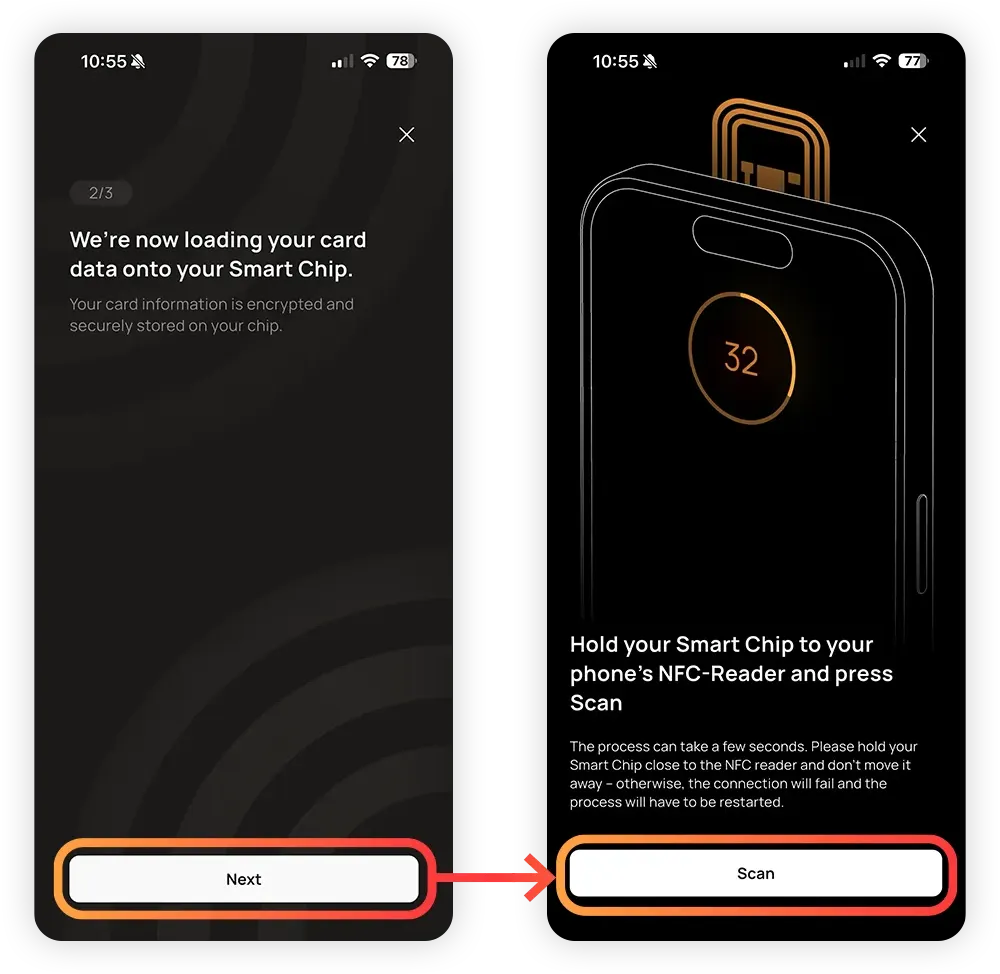
Ora stiamo crittografando i dati della carta e li stiamo inviando a Smart Chip.
Tocca Avanti, poi Scansiona.
1.3
Questo processo funziona esattamente come l'attivazione iniziale del Smart Chip. L'unica differenza è che ci vuole più tempo.
Avvicina il Smart Chip al lettore NFC dello smartphone finché non inizia la procedura.
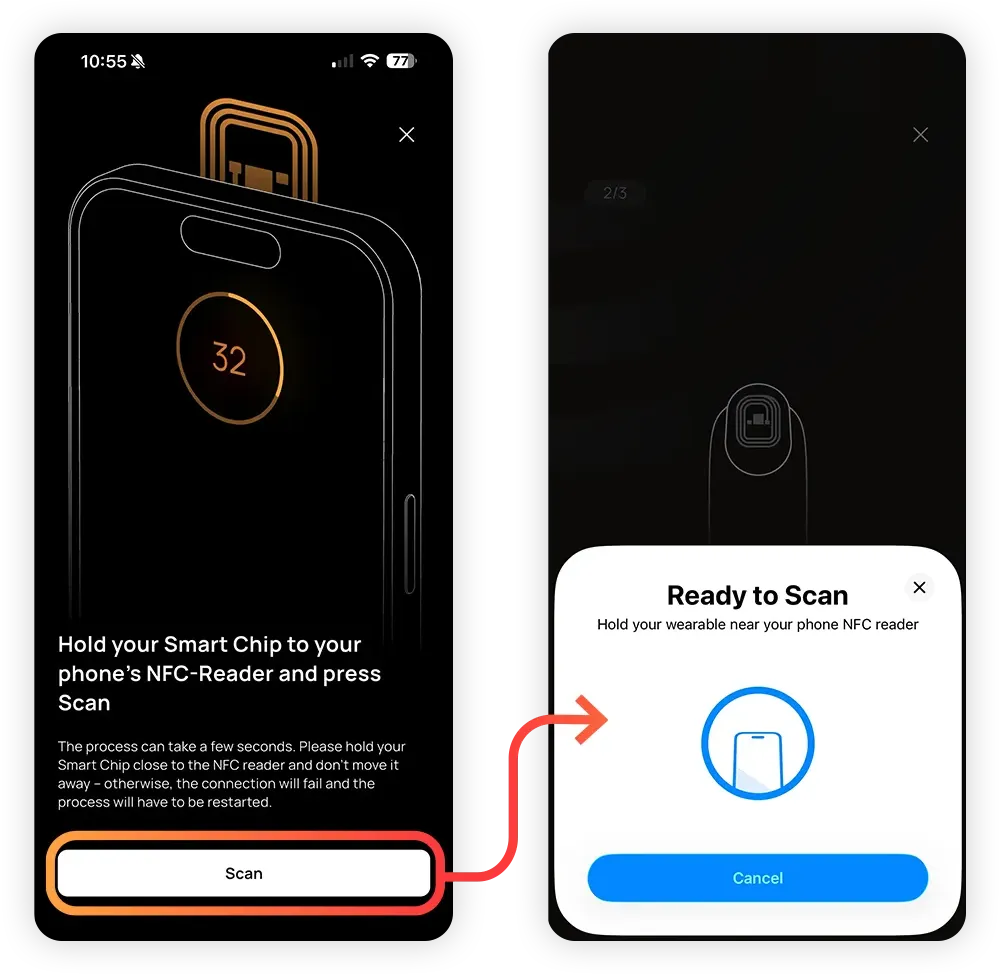
1.3
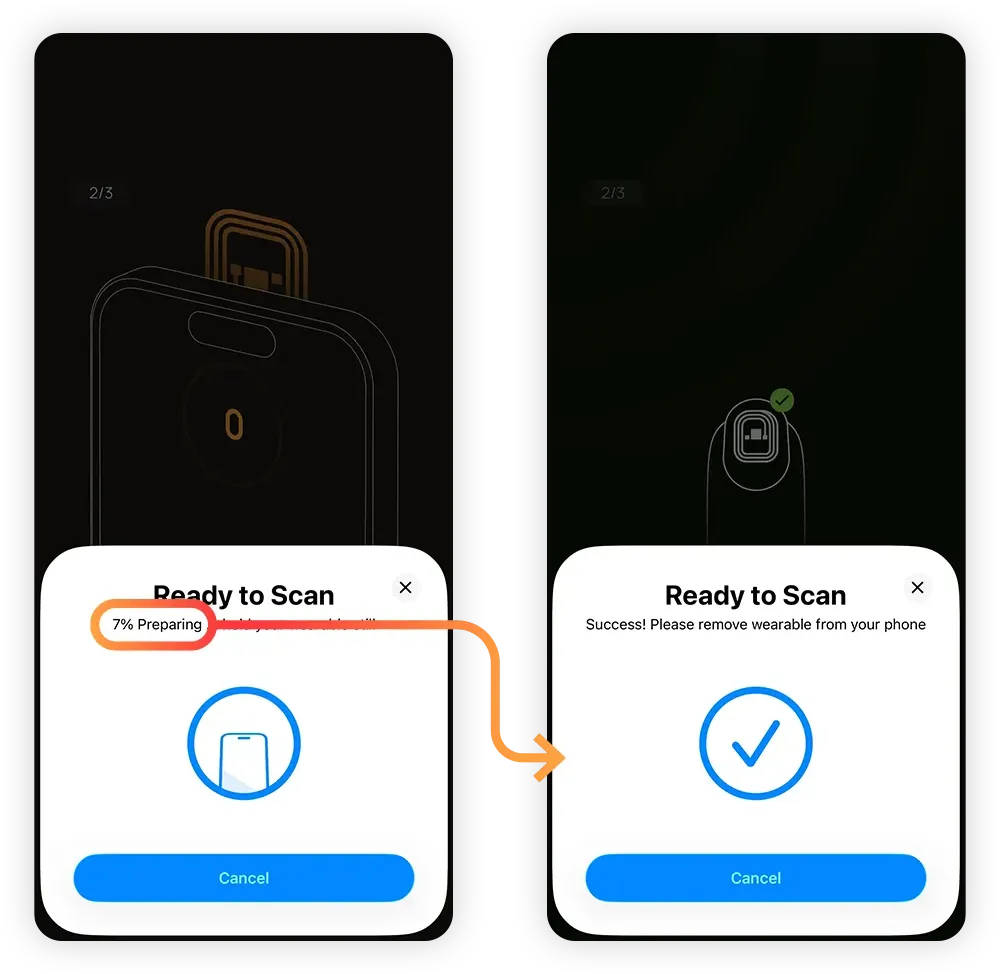
Non appena il processo ha inizio, Non spostare il Smart Chip!
I dati vengono trasferiti in questo momento; ci vorranno pochi secondi. Se sposti il Smart Chip, la connessione si interromperà.
Aspetta che il processo sia finito.
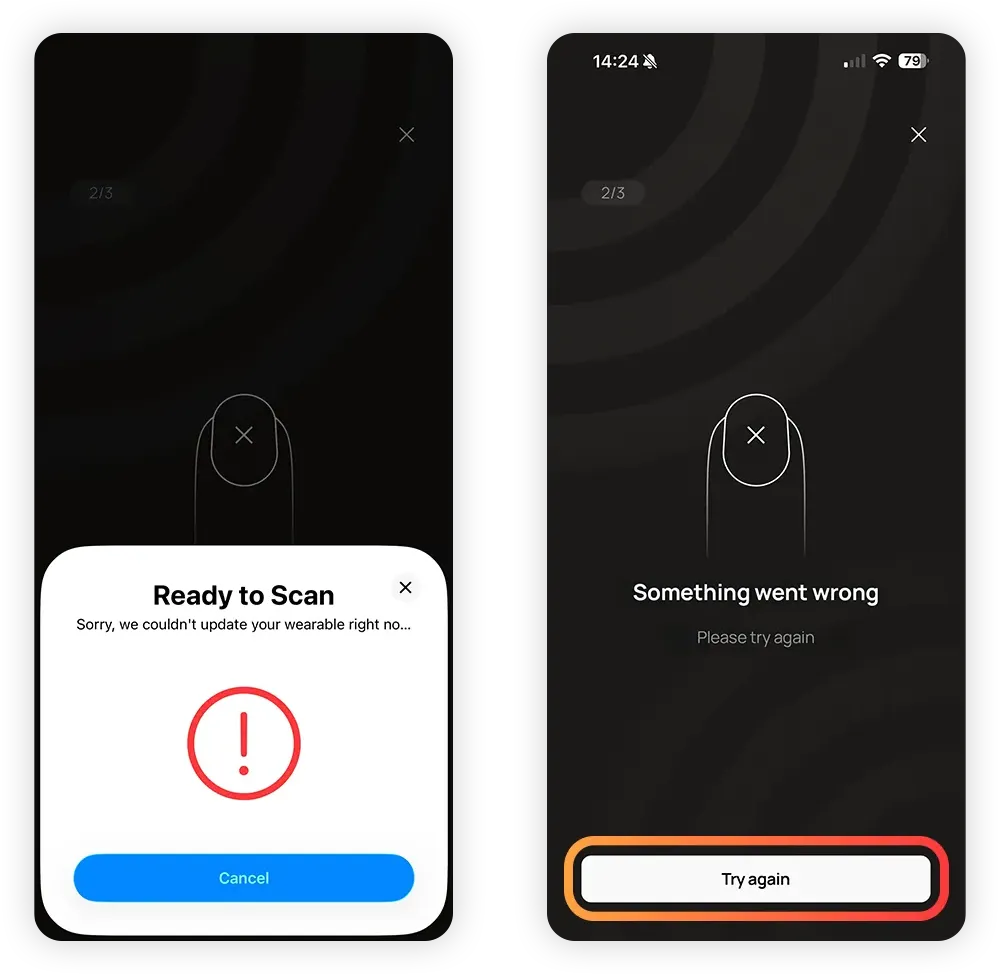
Se il processo viene interrotto, basta toccare Prova di nuovo.
In rari casi, il processo potrebbe non avviarsi più se è stato interrotto troppe volte. Se succede, elimina completamente il Smart Chip dalla schermata iniziale e ricollegalo. Poi ricomincia da capo con la carta di pagamento. Assicurati di tenere il Smart Chip ben fermo contro il lettore NFC e di non muoverlo non appena inizia il processo.
1.3
Per attivare il pagamento contactless con la carta, la funzione deve prima essere autorizzata dalla banca del cliente. Si tratta di una misura di sicurezza volta a prevenire l'uso improprio della carta.
A seconda della banca, puoi farlo tramite codice SMS, telefonata o l'app della banca. L'app Smart Chip ti mostrerà tutte le opzioni disponibili e ti guiderà passo passo nella procedura.
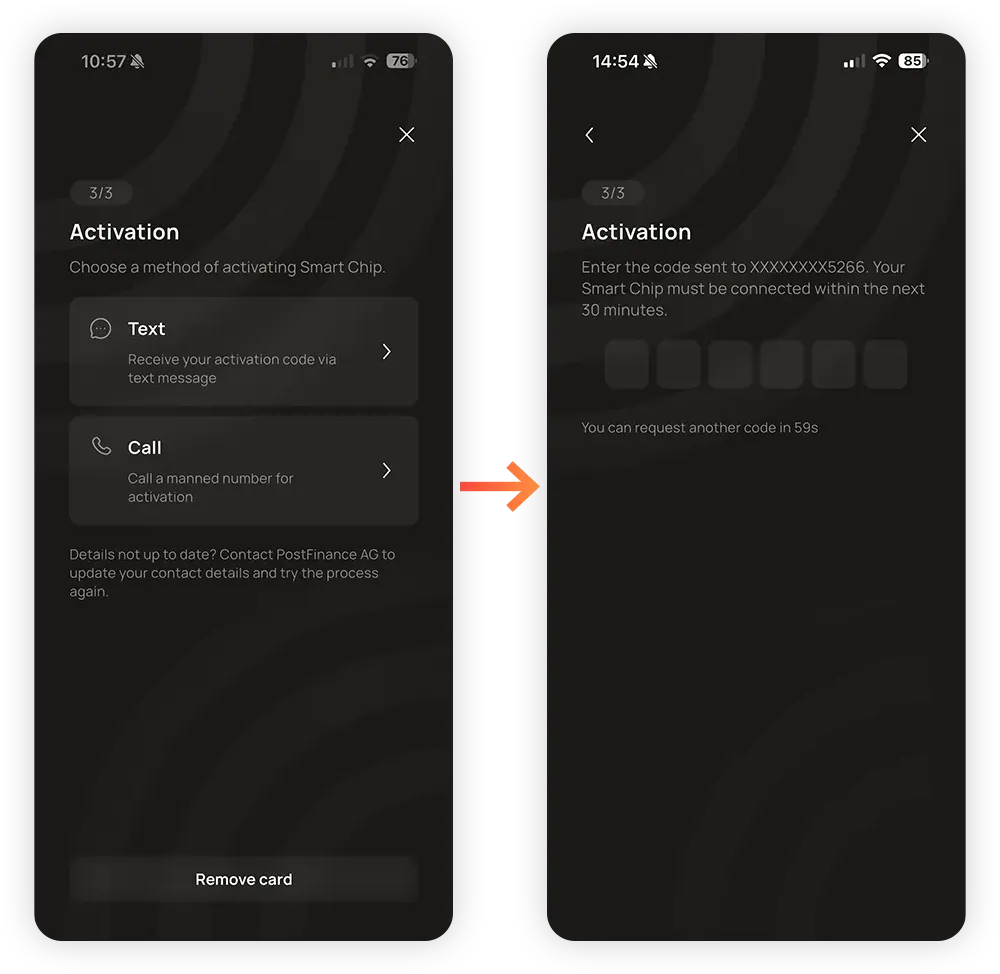
Dopo aver attivato la carta di pagamento, questa è ora collegata e Smart Chip è pronto per i pagamenti contactless.
Ora puoi toccare Fine per tornare alla schermata iniziale oppure Configurazione del biglietto da visita per passare alla funzione "biglietti da visita".
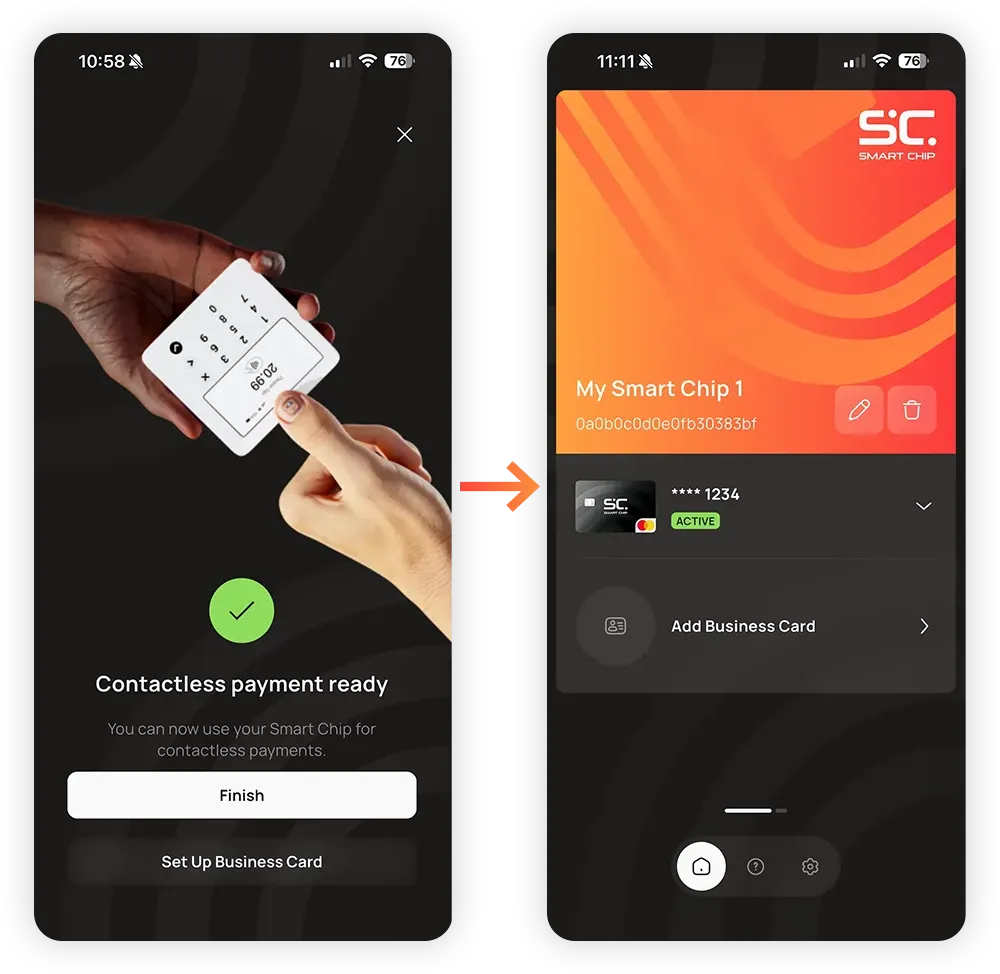
1.3
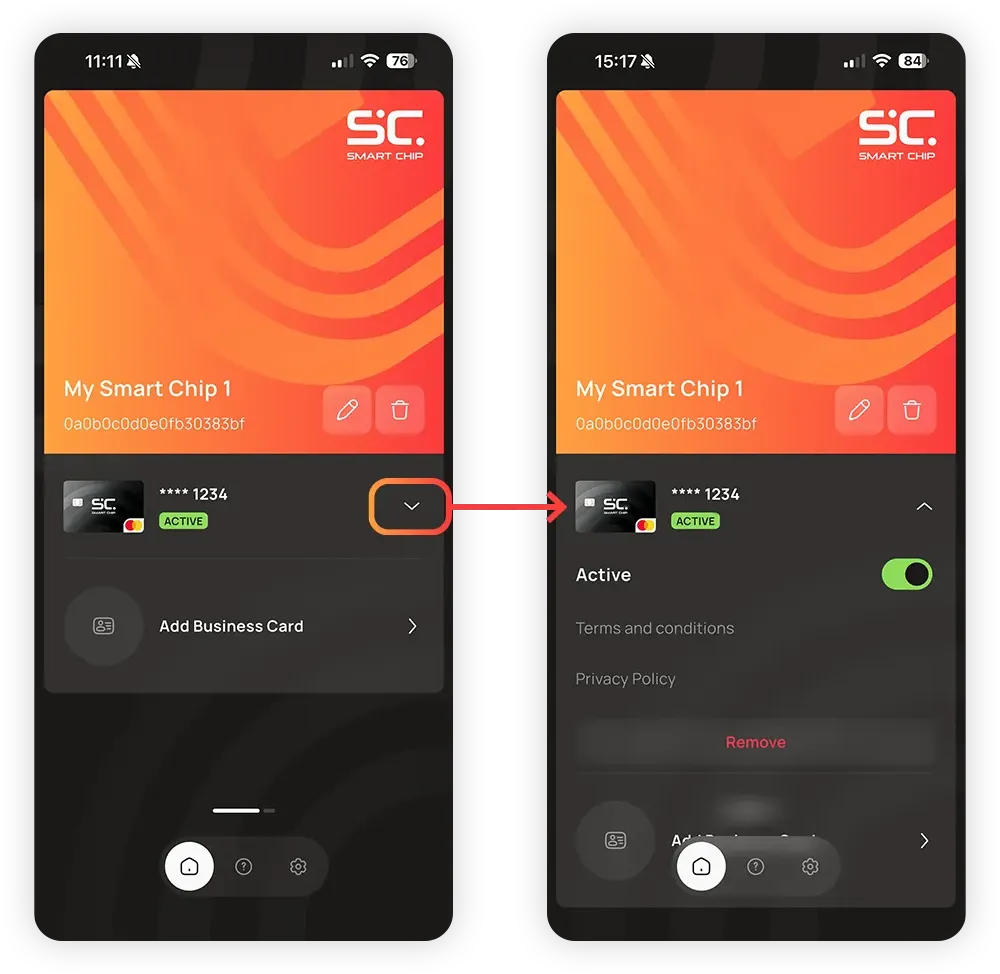
La carta di pagamento è visibile nella schermata iniziale. Mostra al cliente che, toccando la freccia, si apre la carta e compaiono alcune opzioni:
Attivo: Puoi usare il cursore per disattivare temporaneamente la carta.
Rimuovi: In questo modo la carta viene rimossa definitivamente dal Smart Chip. Puoi aggiungerla di nuovo, o inserire un’altra carta, in qualsiasi momento.
1.4
Aggiungere un biglietto da visita su Smart Chip ti permette di condividere in modo facile e veloce i tuoi dati di contatto, come nome, numero di telefono, email, informazioni aziendali e account sui social media.
I clienti non devono compilare tutto; basta che inseriscano solo quello che vogliono condividere.
Suggerimento:
Dimostra questa funzione usando il tuo Smart Chip sul telefono del cliente. Così potrà vedere come funziona e, allo stesso tempo, potrai condividere i tuoi recapiti aziendali!
1.4
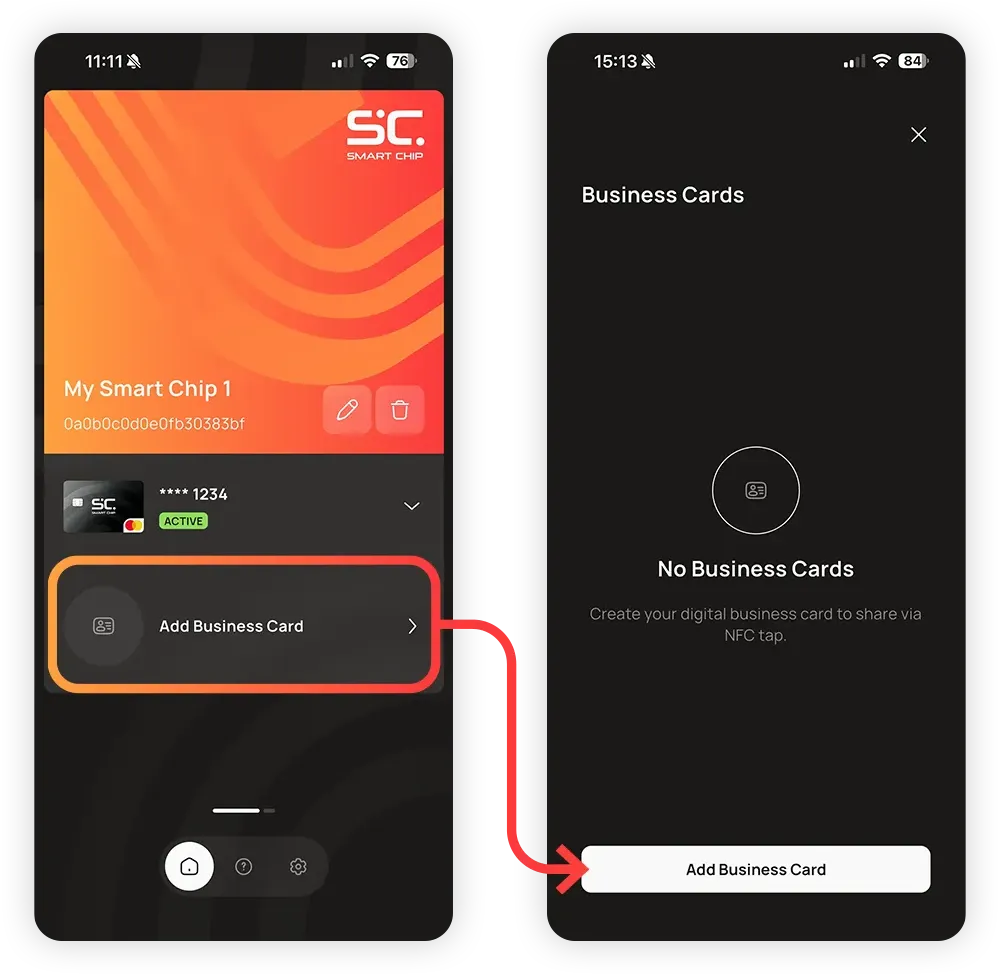
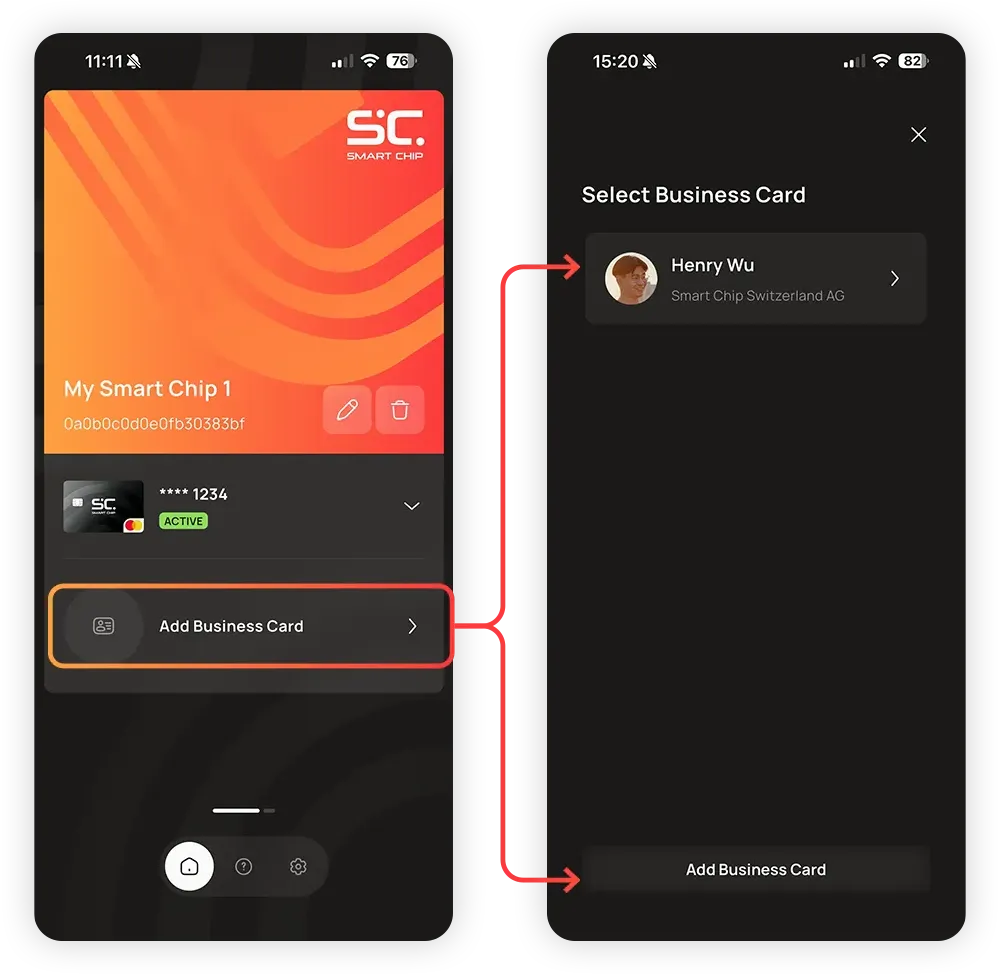
Tocca Aggiungi un biglietto da visita sulla schermata iniziale.
Vedrai un elenco dei biglietti da visita aggiunti in precedenza. Tocca Aggiungi biglietto da visita per crearne uno nuovo.
1.4
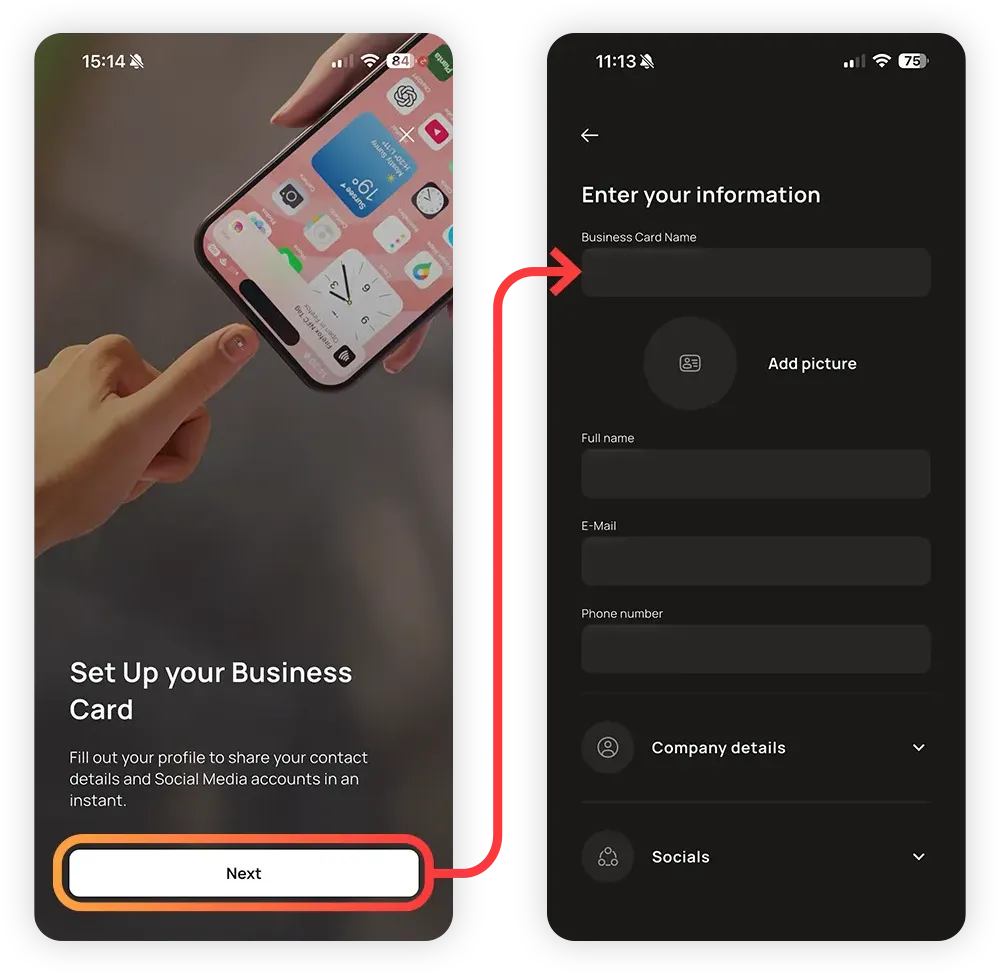
Tocca Avanti per visualizzare il biglietto da visita.
1.4
Qui i clienti possono inserire tutte le informazioni che vogliono (o anche solo quelle che preferiscono). Sta solo a loro decidere quanto vogliono condividere.
Importante: dopo aver compilato il modulo, devi scorrere verso il basso e toccare Salva, altrimenti le informazioni andranno perse.
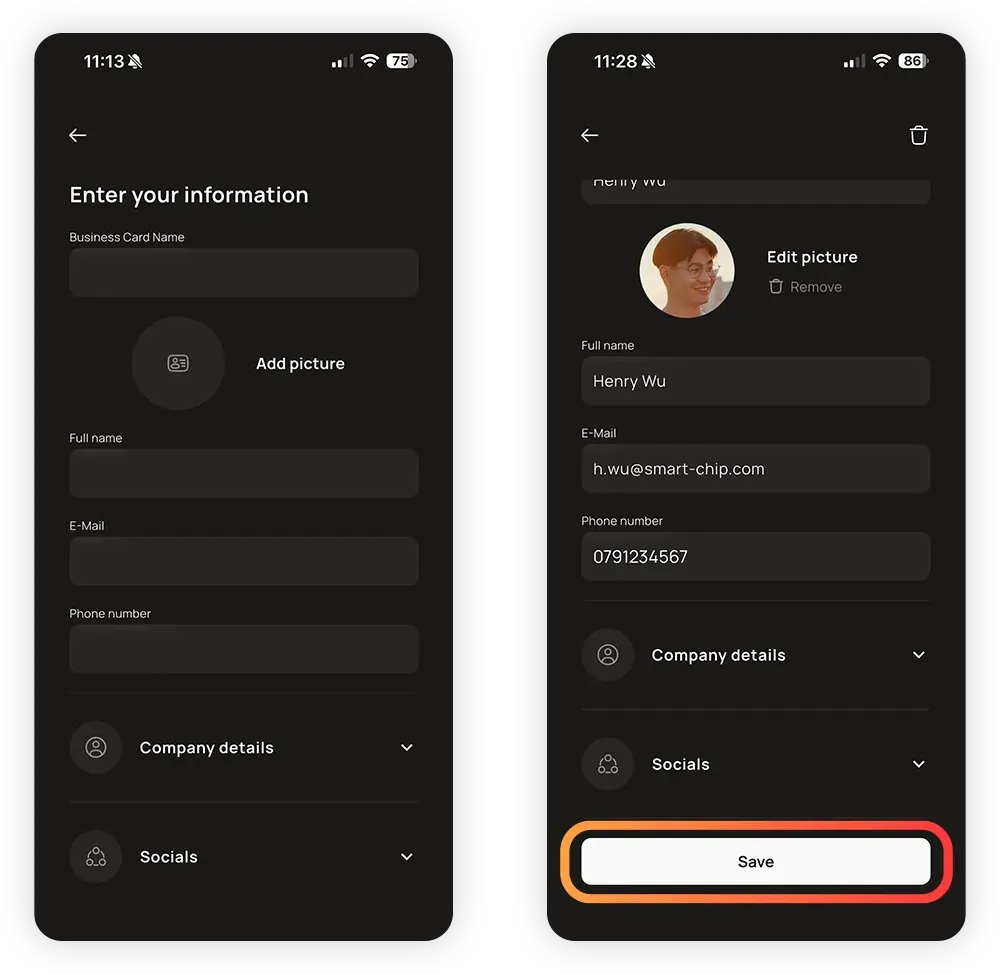
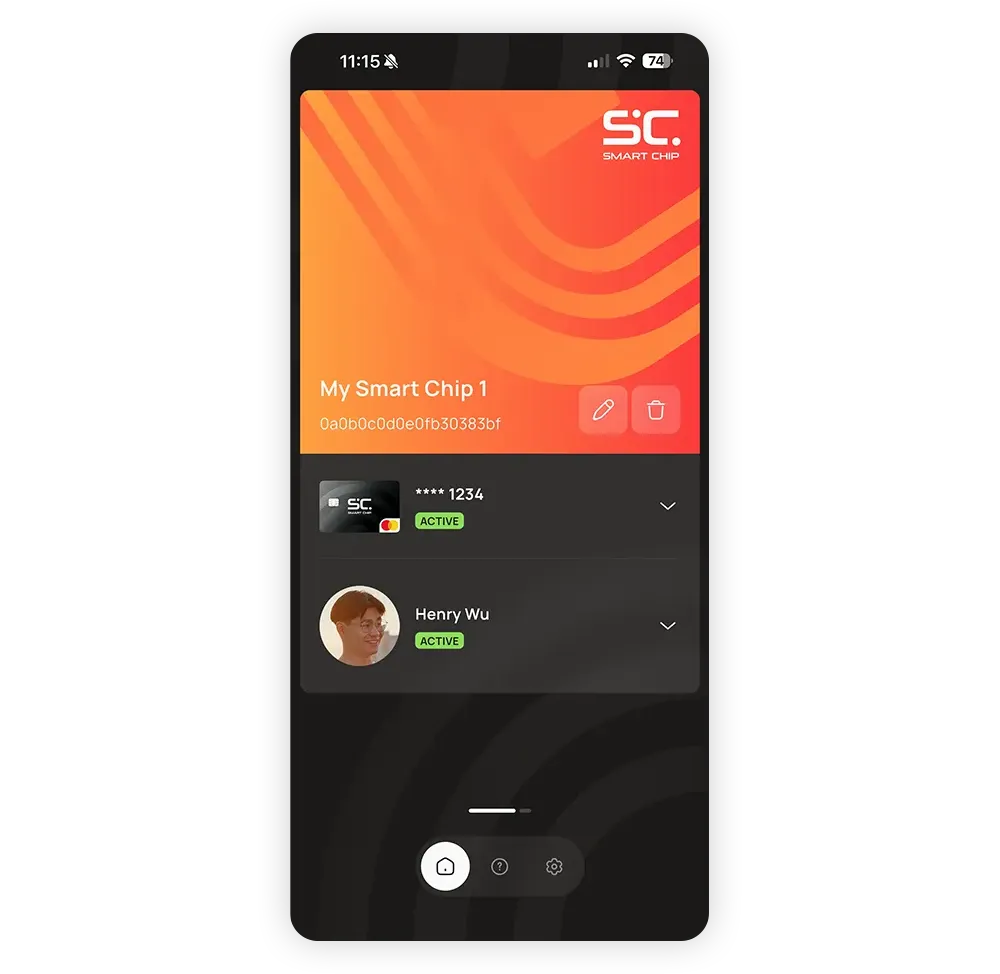
Il biglietto da visita è ora attivo su Smart Chip e pronto per essere condiviso.
Funziona semplicemente avvicinando il dito al lettore NFC di un telefono.
1.4
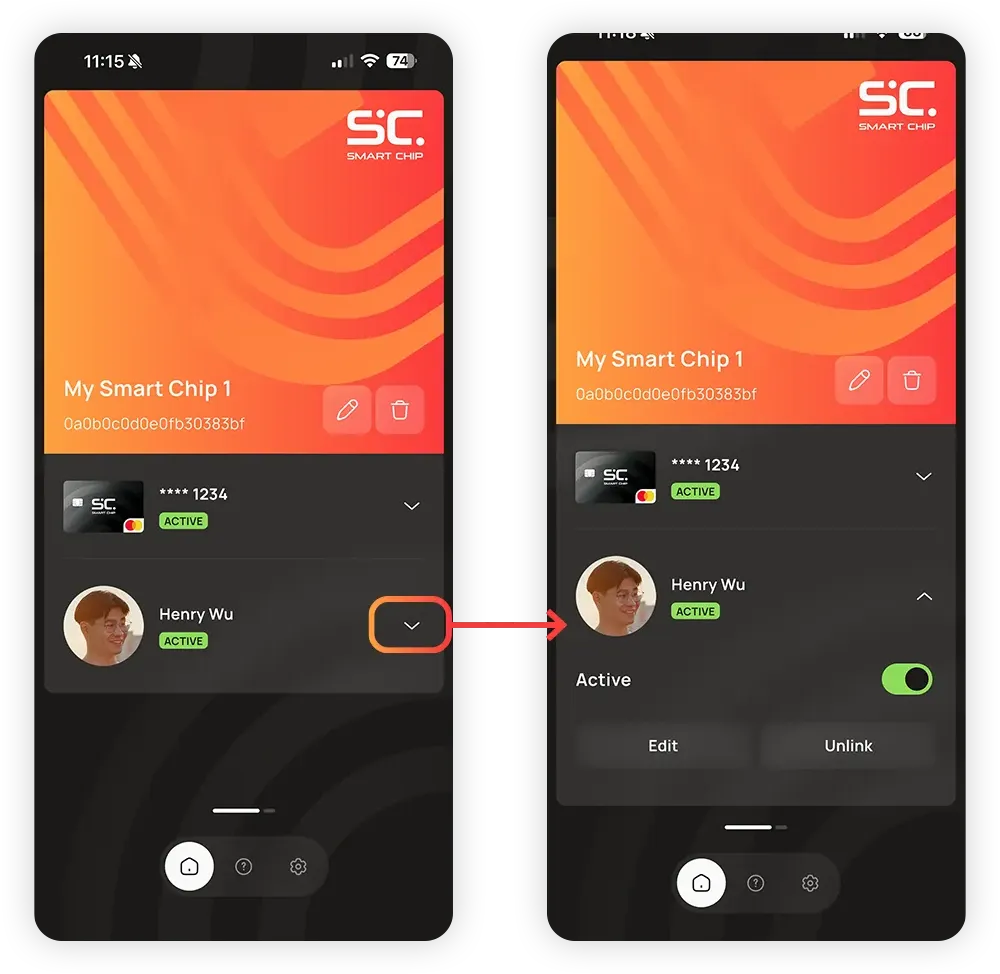
Proprio come la carta di pagamento, anche la carta aziendale attiva viene visualizzata nella schermata iniziale. Tocca la freccia per accedere ad altre impostazioni:
Attivo: Qui puoi disattivare temporaneamente il biglietto da visita.
Modifica: Per modificare, aggiungere o eliminare singole voci dalla scheda attiva.
Rimuovi collegamento: Questa operazione scollega il biglietto da visita dal Smart Chip. Il biglietto da visita o un'altra scheda possono essere ricollegati in qualsiasi momento.
1.4
Quando il biglietto da visita viene disconnesso, il campo relativo al biglietto da visita nella schermata iniziale tornerà vuoto. Se tocchi Aggiungi biglietto da visita, tornerai all'elenco dei biglietti da visita. Qui puoi selezionarne uno esistente o crearne uno nuovo con Aggiungi biglietto da visita.
Questo è utile se, per esempio, un cliente vuole avere un biglietto da visita professionale e uno personale.
1.5
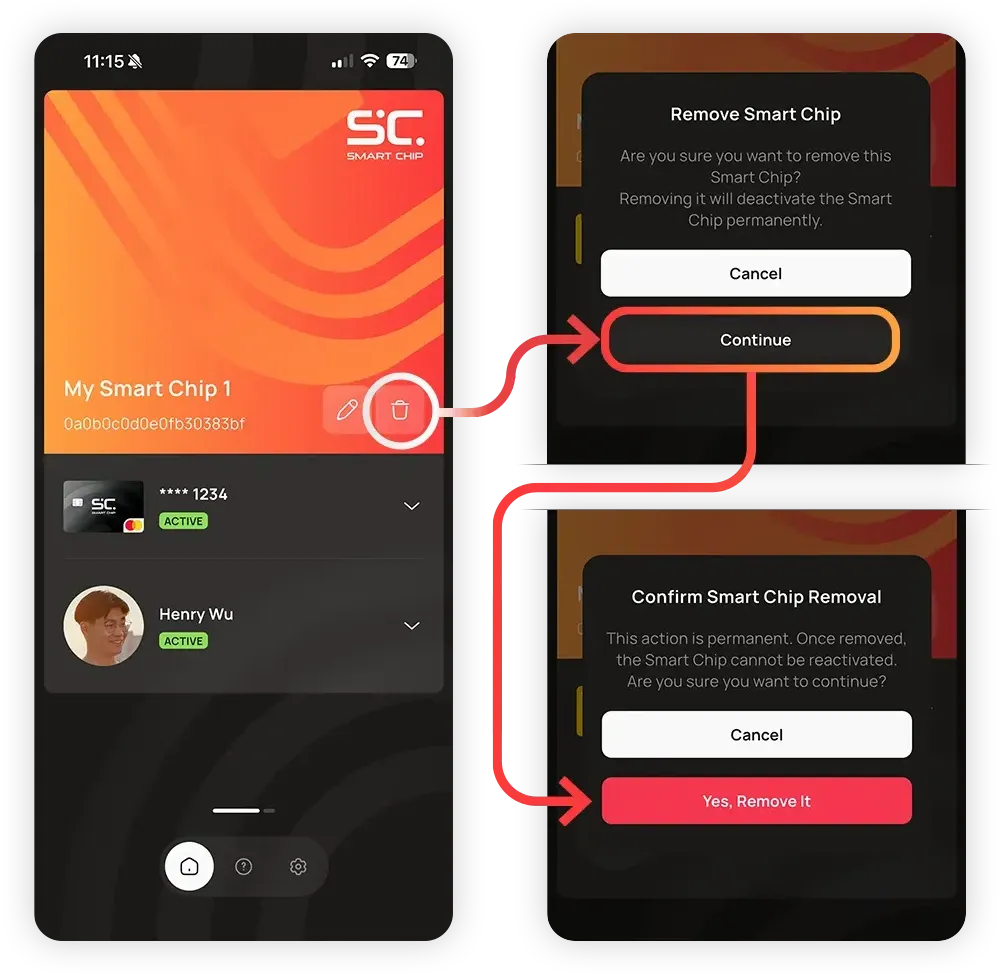
Se il Smart Chip viene sostituito o se il cliente non lo vuole più, va cancellato e rimosso dall'account.
Quando rimuovi un vecchio Smart Chip e ne monti uno nuovo, assicurati di eliminare il vecchio chip dall'app.
Tocca l'icona del cestino per eliminare il Smart Chip dall'account.
Nota:
Il testo dice che un Smart Chip cancellato non può essere riattivato. È un avvertimento per evitare che venga cancellato per sbaglio.
Tecnicamente parlando, una carta Smart Chip può essere aggiunta nuovamente allo stesso account senza alcun problema. Tuttavia, tutte le carte di pagamento devono essere configurate di nuovo da zero.
Se dovessero sorgere dei problemi con un Smart Chip, eliminarlo e aggiungerlo di nuovo può essere un primo passo utile per risolvere il problema. Dopo averlo aggiunto di nuovo, controlla se il problema persiste. Molti problemi si risolvono proprio così.
 English English
  Deutsch
 Español
 Français
 Italiano
 Português
 Čeština
 Polski
 Svenska