•
Cembra Mastercard Gold


Chapter 1
Before customers can use the Smart Chip, a little preparation is necessary. They need the Smart Chip app, an account, and a credit or debit card that works with the Smart Chip. In this chapter, you will learn how to set everything up.
Customers should download the app and create an account before coming to your studio. This saves you valuable time.
Important: Set up the Smart Chip before applying it to the nail. This way, you will notice immediately if it is not working and can replace it without any extra effort.
This is chapter 1 of the training course.
For training on how to apply the Smart Chip to the nail refer to Chapter 2.
1.1
Customers need a Smart Chip account to use their Smart Chip.
To help them prepare for the appointment, you can send them this link: smart-chip.com/preparation
1.1
The Smart Chip is managed through the Smart Chip App. It is available for iOS and Android.


1.1
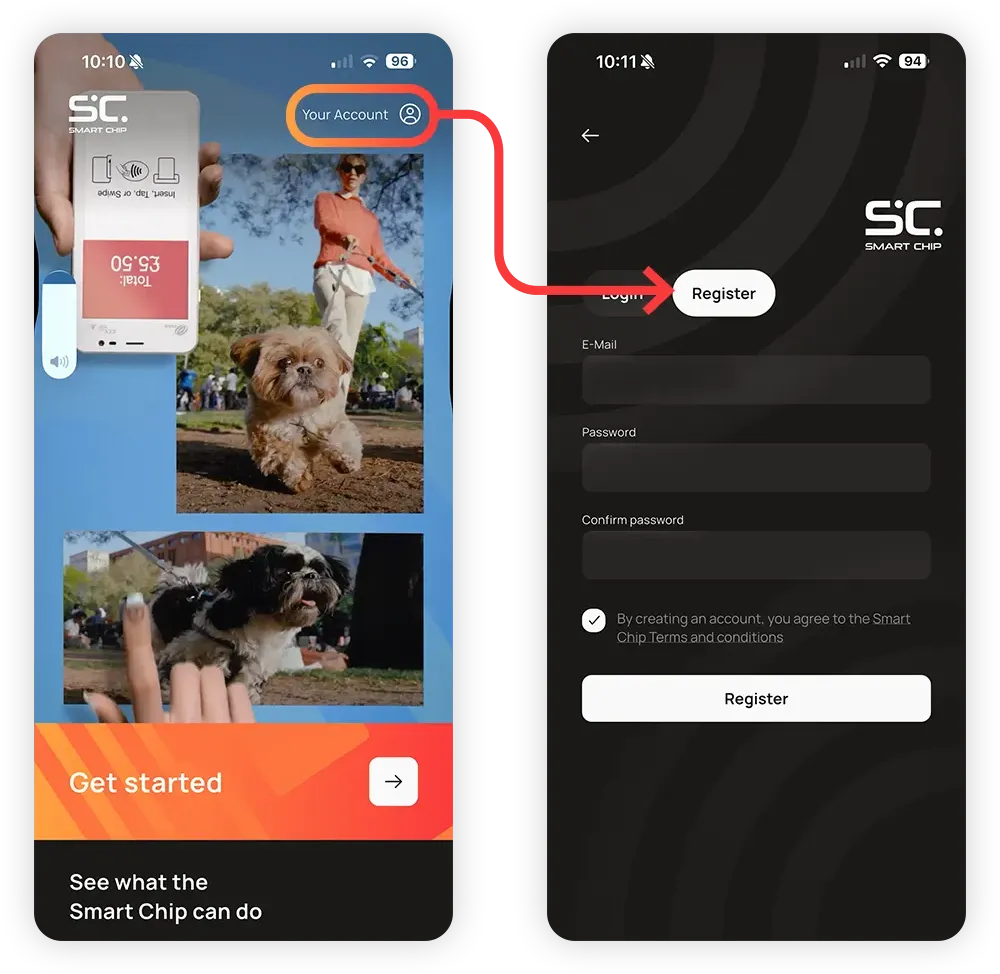
The fastest way to create an account is to tap Your Account in the top right, then Register.
1.1
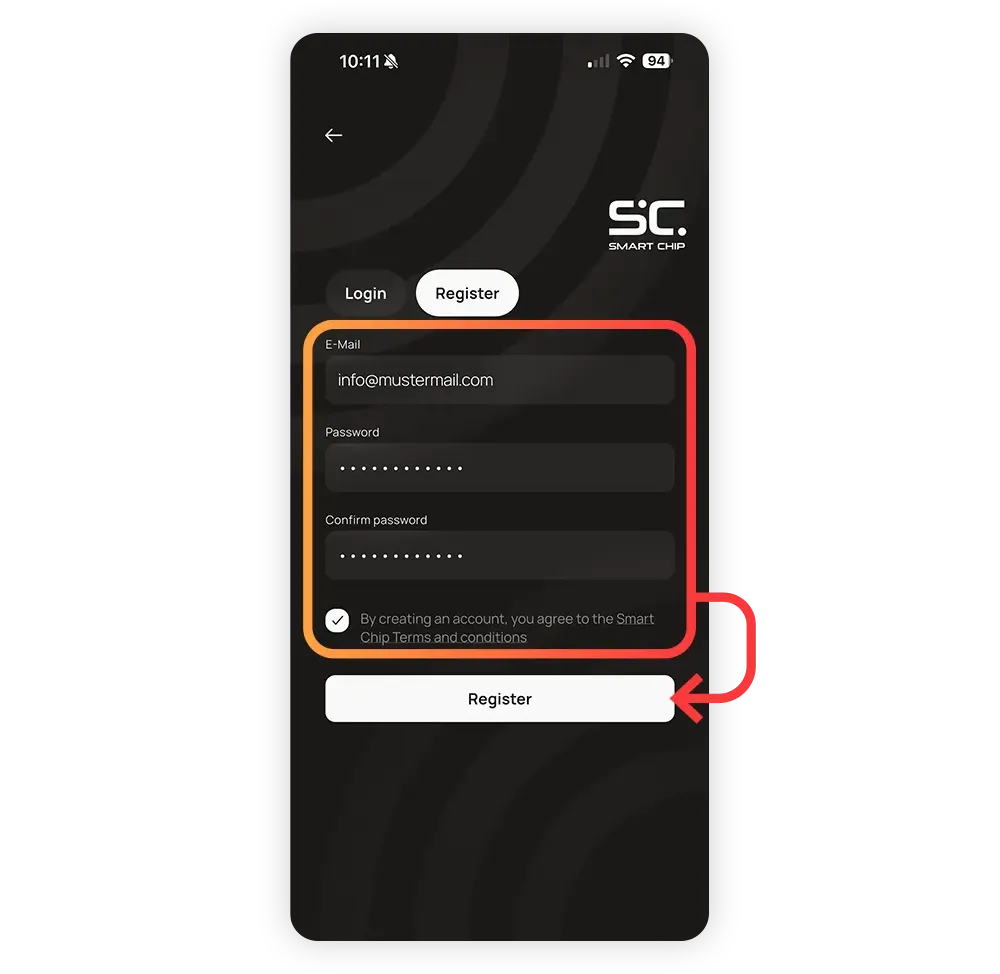
Customers fill in their email and the password of their choice.
After agreeing to the terms and conditions, they tap Register.
1.1
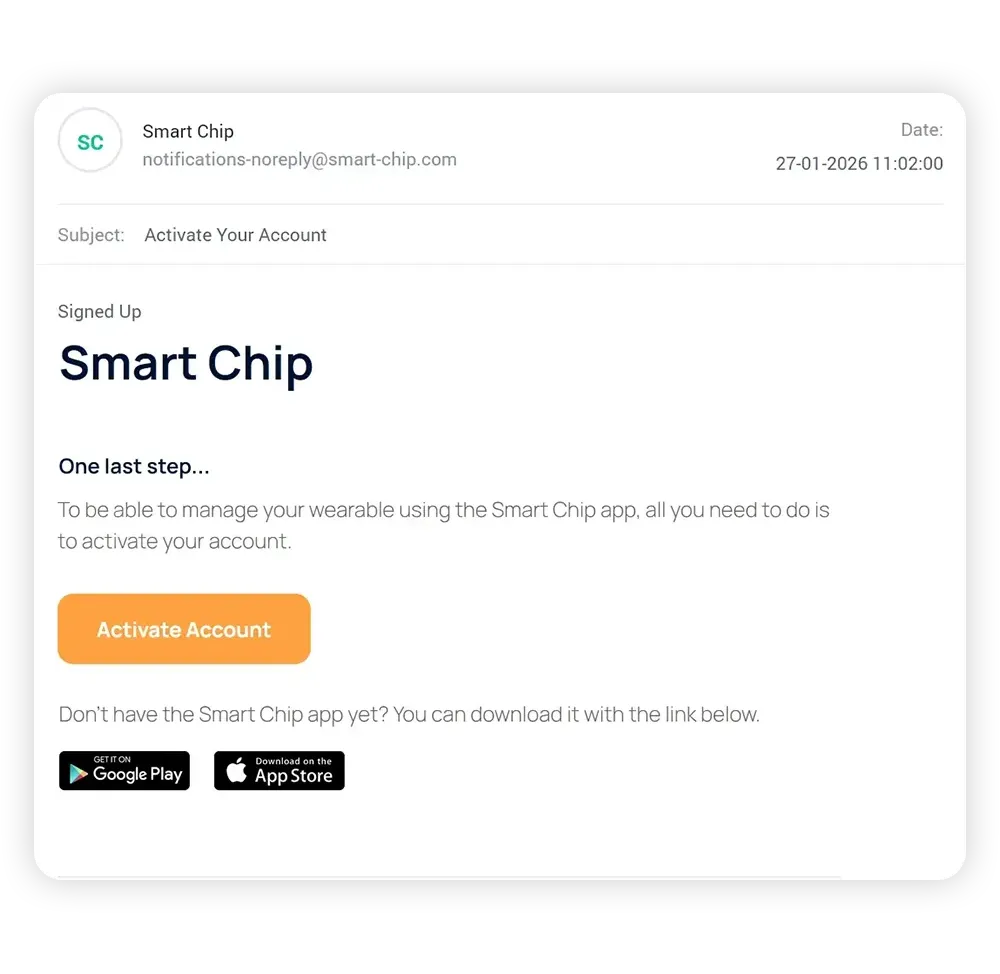
After tapping Register, an email is sent to the email address. This is a safety feature to combat misuse of email adresses.
Customers need to open the mail and tap Activate Account. The account is now ready to use.
1.1
Back in the Smart Chip app, customers need to log in. They tap on Login or Your Account in the top right, enter their email and password, and tap Login.
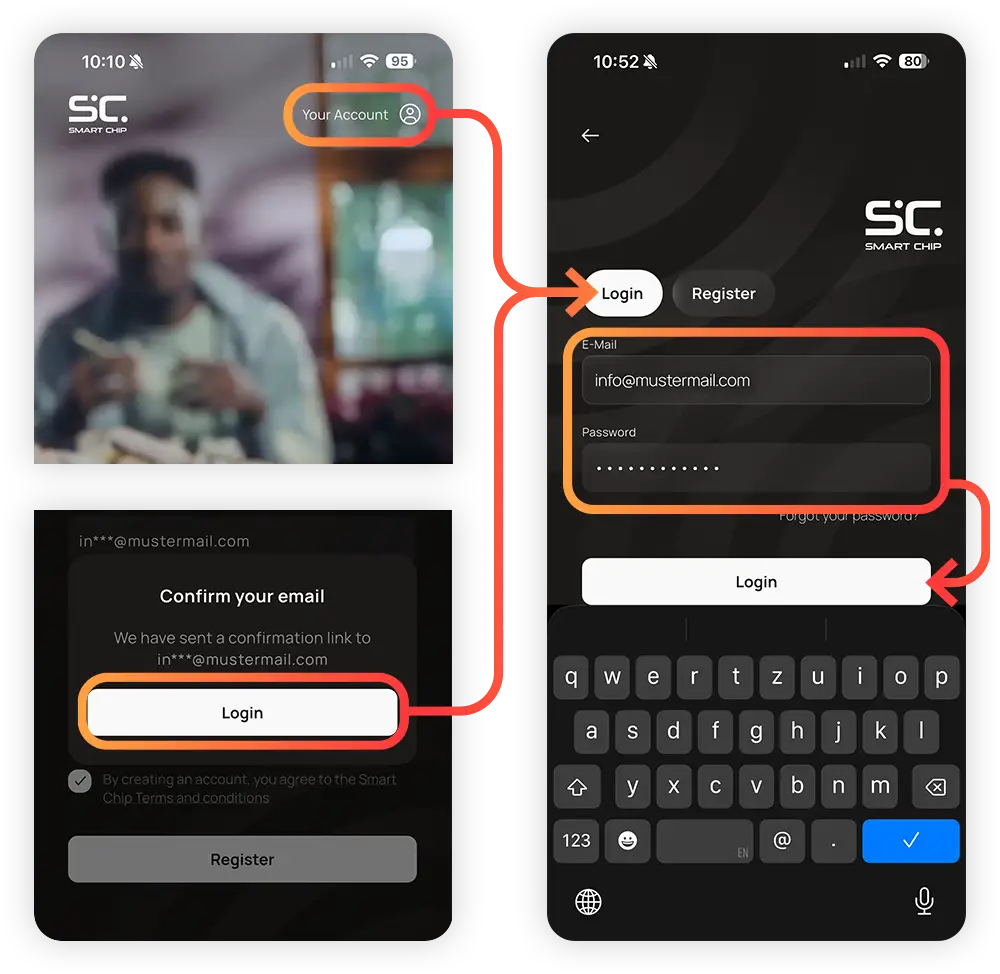
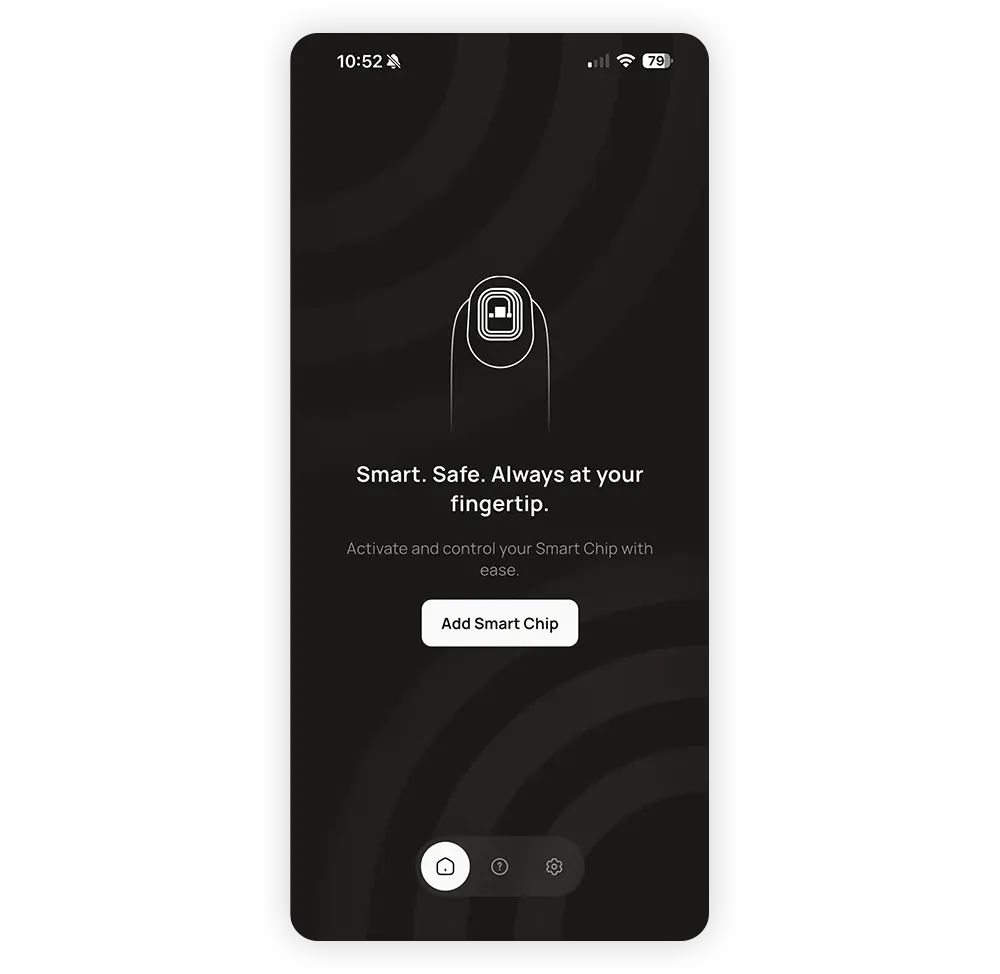
That’s all the steps needed to create and activate a Smart Chip account. If customers see this screen, they are ready to activate their first Smart Chip.
If they have any questions or problems, send them the link to smart-chip.com/preparation
and point out that they can find more detailed instructions (if necessary) under point 3.
1.2
The following steps are done in the studio by either you or the customer.
Many customers want a little help with the initial setup. That’s why it’s important that you understand these steps and can help them with any questions they may have.
1.2
Make sure that the customer is logged in to their Smart Chip account.
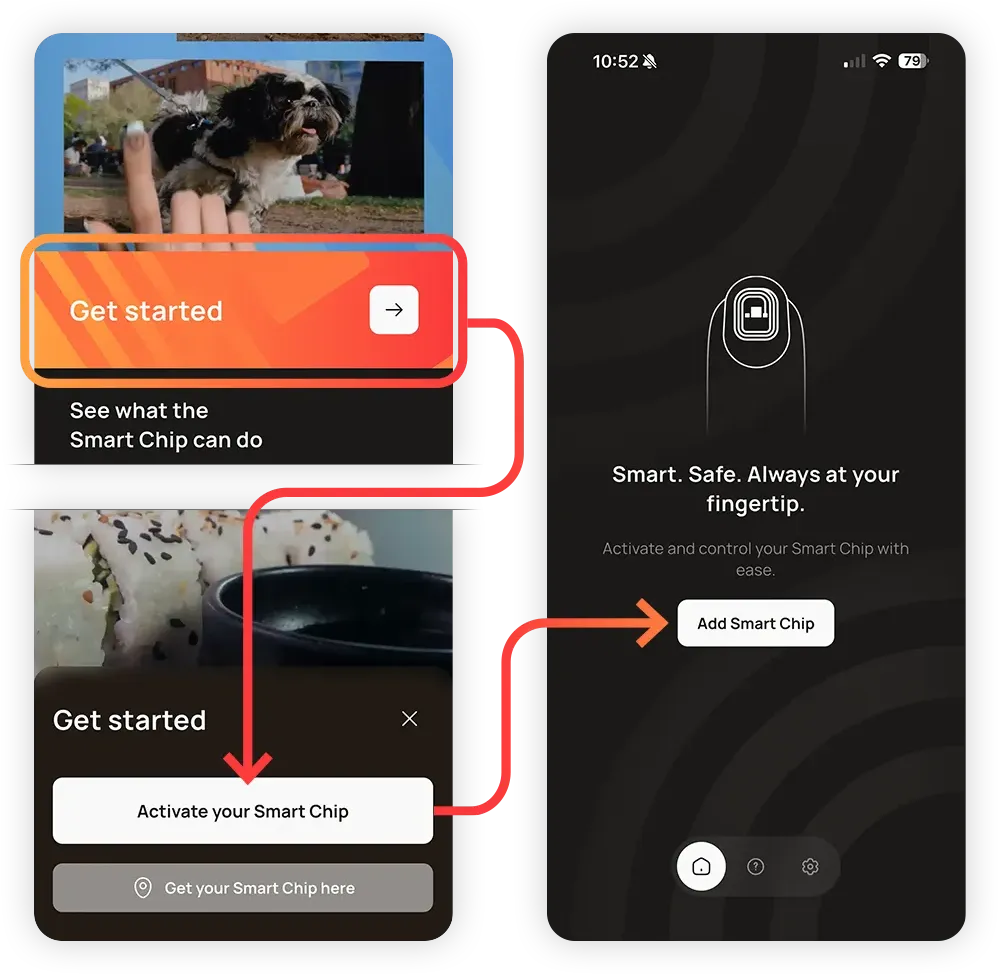
Ask them to tap Get Started, then Activate Your Smart Chip on the home screen. If they land on the screen on the right, everything is fine. If they are instead directed to the Login/Register screen, they will need to log in or create an account if they don’t already have one. Help them with the setup if needed.
1.2
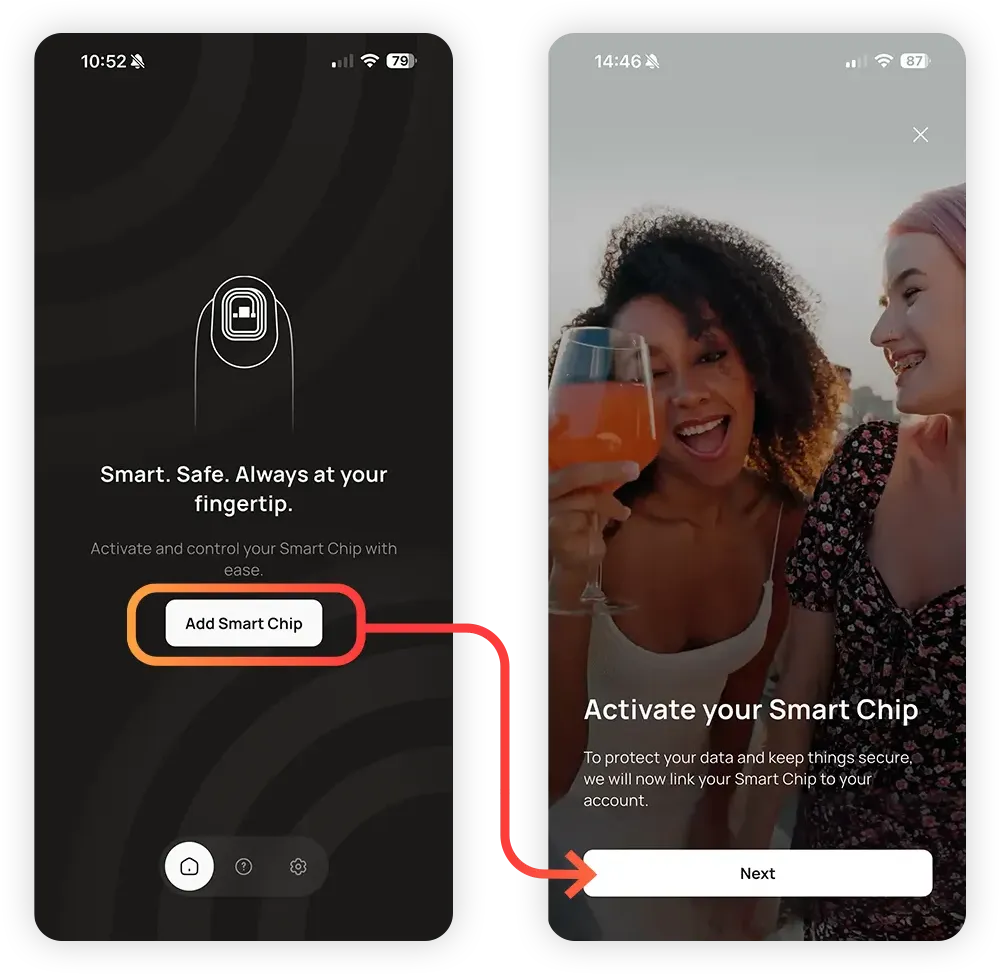
We will now activate the customer’s Smart Chip. Do this before attaching the Smart Chip to the nail. This allows you to replace a defective chip without any hassle.
Tap Add Smart Chip, then Next.
1.2
The Smart Chip uses the phone’s NFC reader to make a connection and activate. To do this, it has to be held close to the reader.
The animation on the screen shows the position of the reader depending on the device.
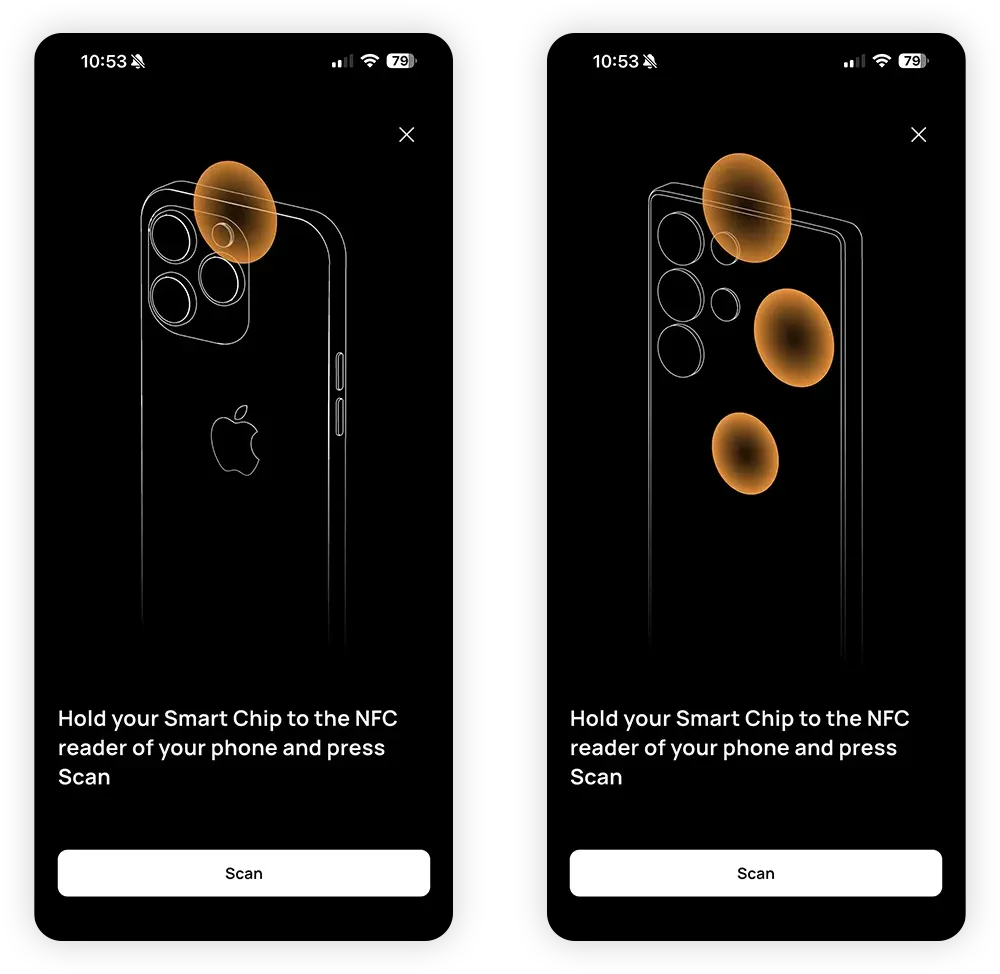
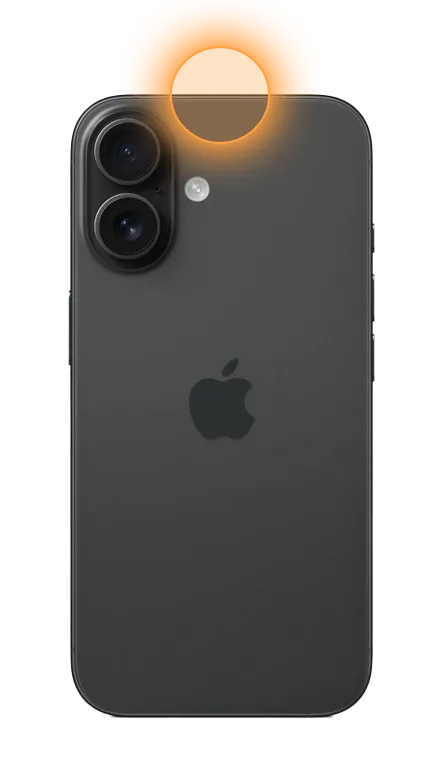
On Apple devices, the NFC reader is located at the top of the device.
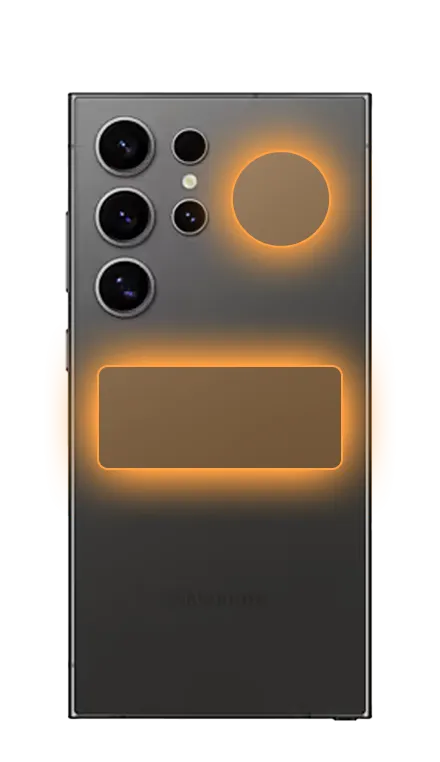
On Android devices, the NFC reader is most commonly located at the back next to the camera or in the middle of the device.
1.2
Tap Scan.
Hold the Smart Chip to the NFC reader of the phone. You might have to move it around slowly until you have found the correct position.
If you have trouble connecting and the phone uses a thicker case, try removing it.
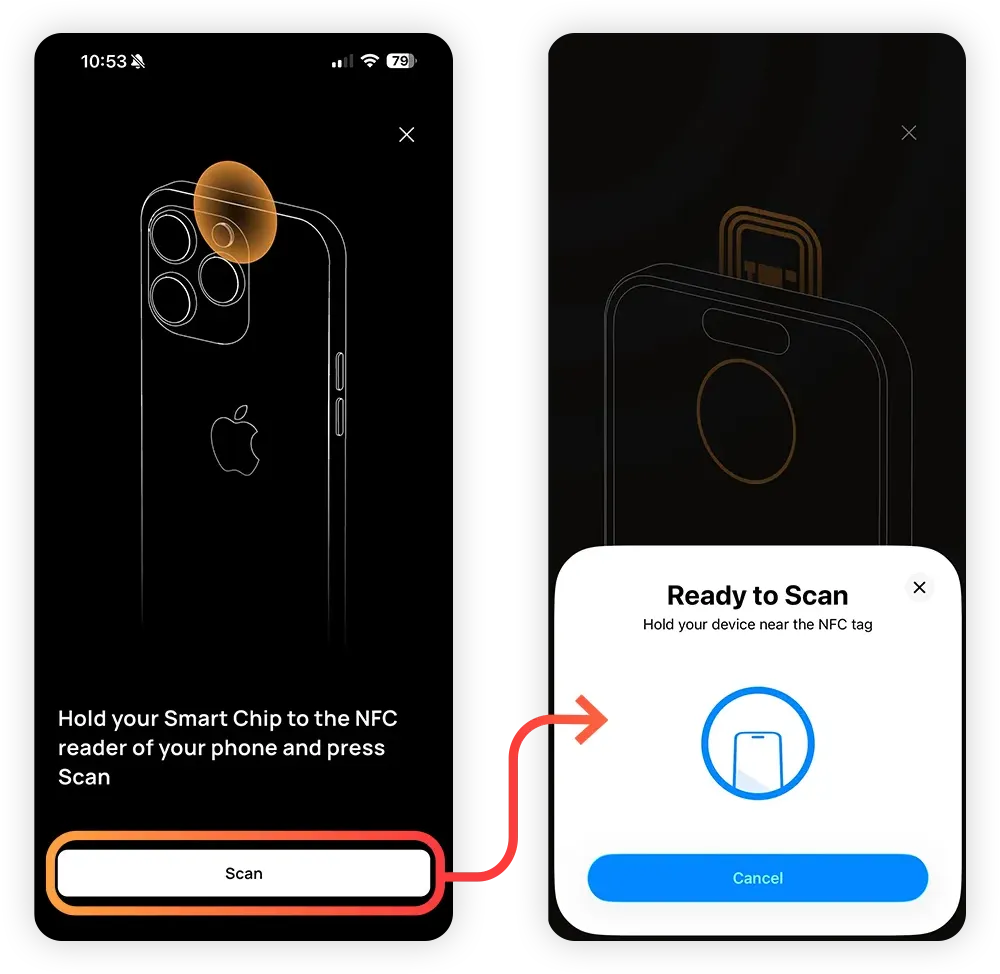
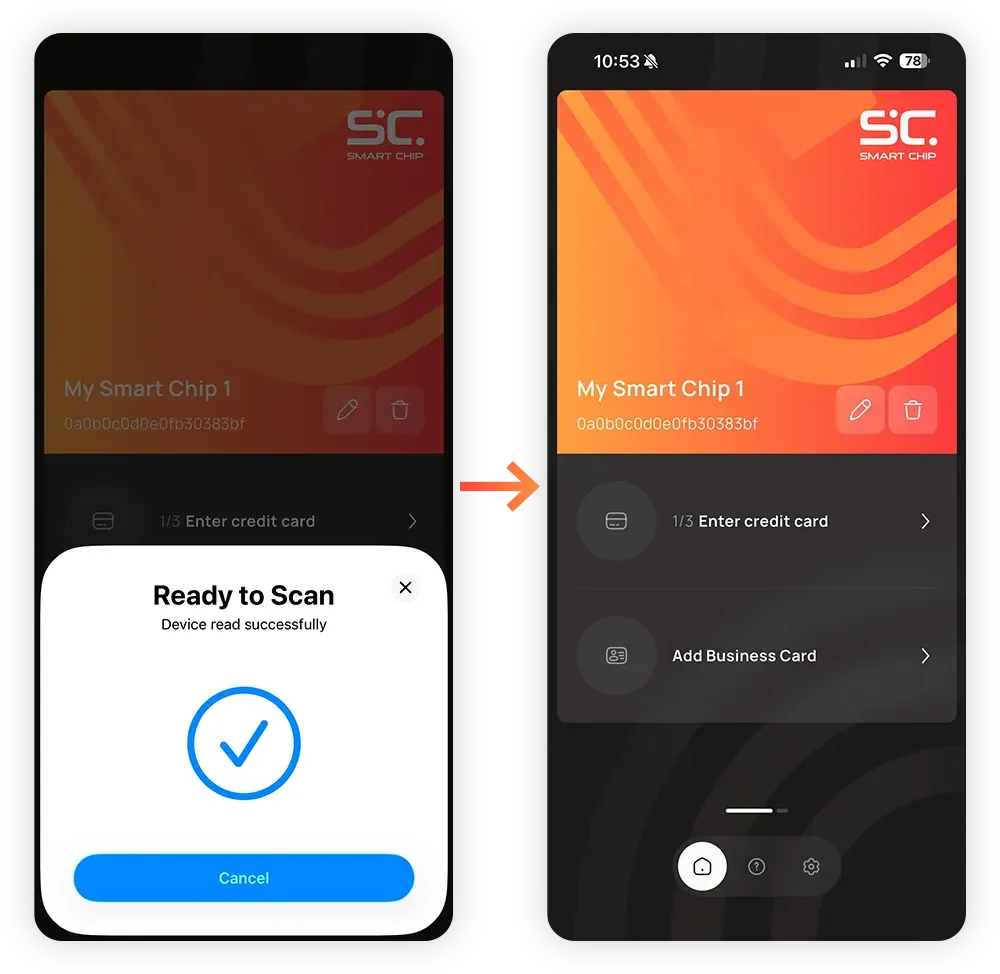
As soon as the Smart Chip is held to the correct place, it connects and you are redirected to the Home Screen.
The Smart Chip is now ready to use.
1.3
We are now connecting the customer’s payment card to their Smart Chip.
The card data will be encrypted and sent to the Smart Chip, then deleted from the app. The Smart Chip follows the highest security standards to ensure the safety and privacy of all data.
1.3
Tap 1/3 Enter credit card, then Next.
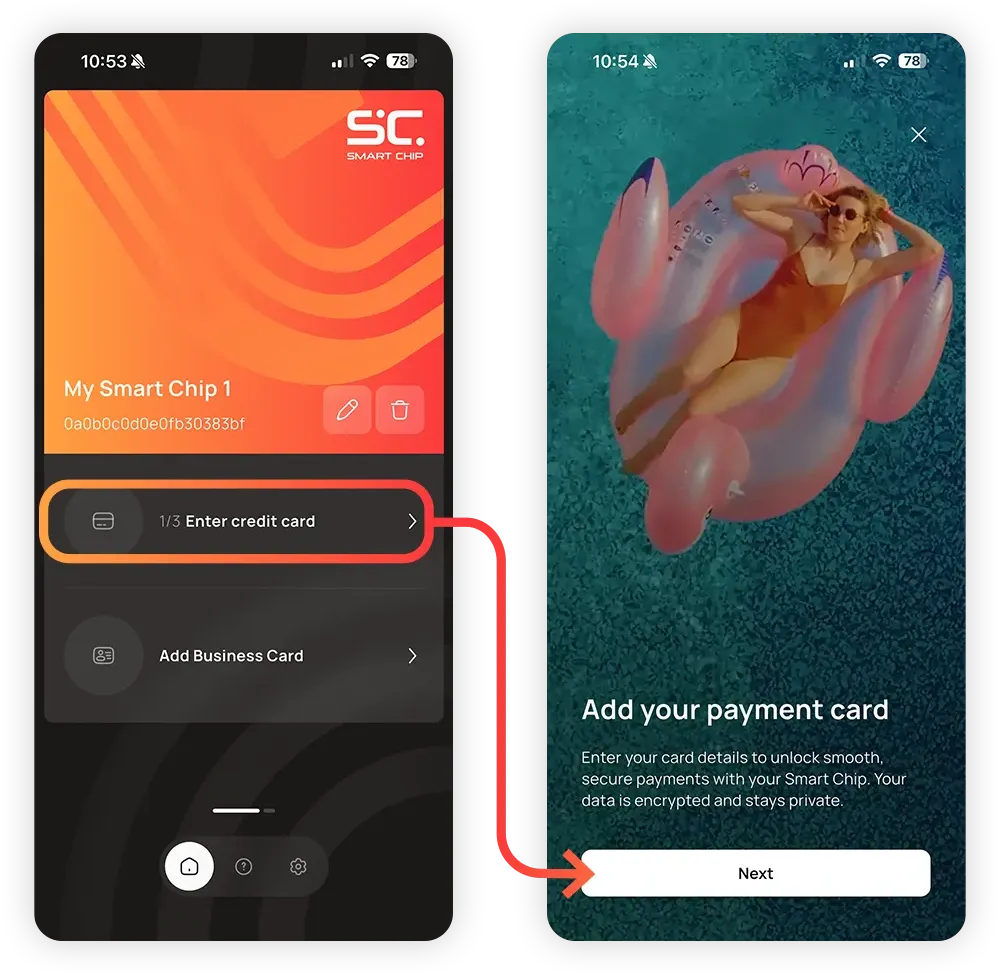
1.3
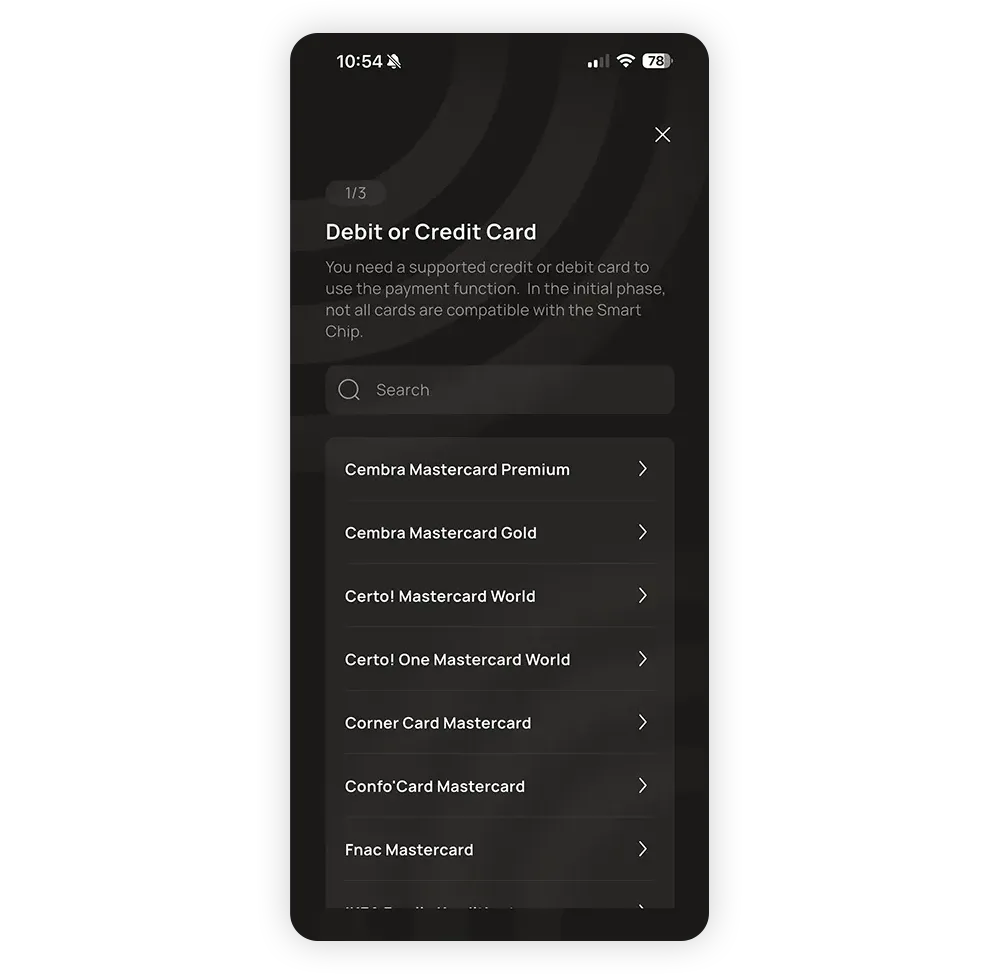
Select the customer’s card from the list. If the card is not listed, it is unfortunately not supported yet.
Cembra Mastercard Gold
Cembra Mastercard Premium
Certo! Mastercard World
Certo! One Mastercard World
Confo’Card Mastercard
Corner Card Mastercard
Curve
Fnac Mastercard
IKEA Family Kreditkarte
LIPO Mastercard
PostFinance
SPAR Mastercard World
Swiss Bankers Life Digital
TCS Member Mastercard
TCS Travel Mastercard Gold
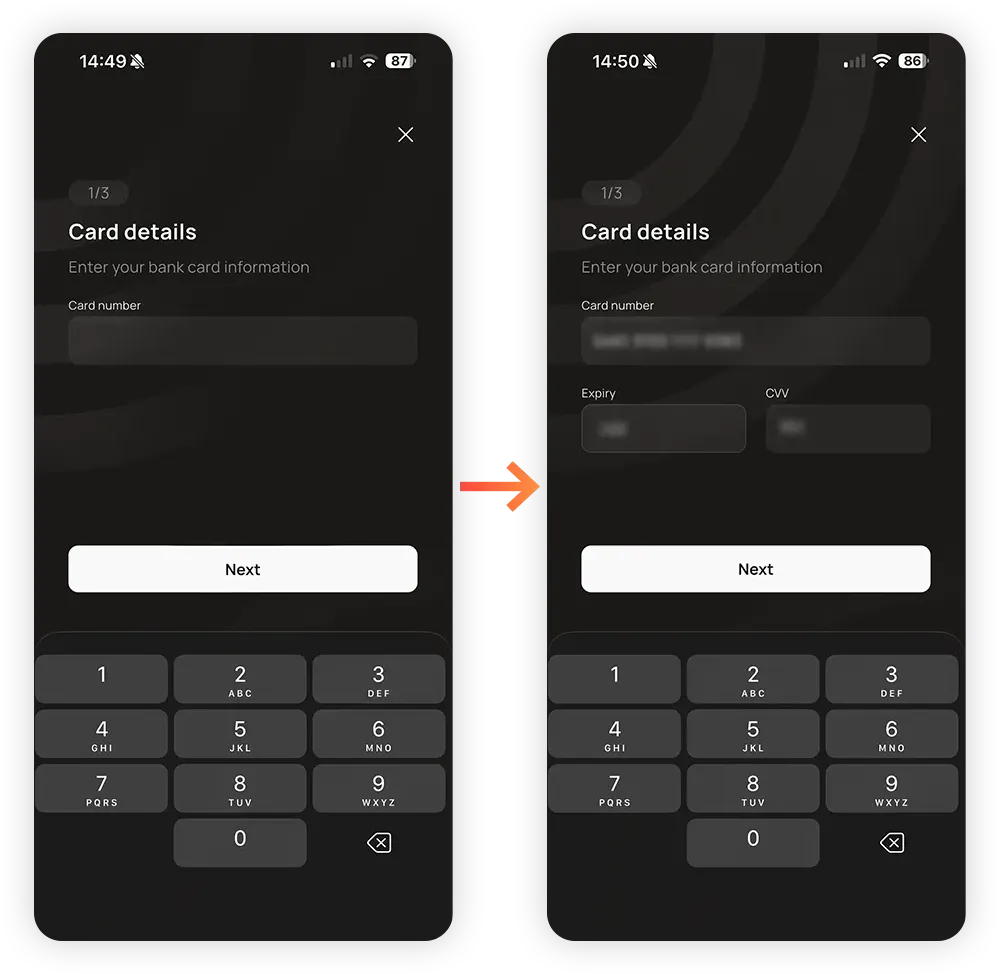
1.3
Ask the customer to enter their card details: The card number, the expiry date and the CVV.
They tap Next when they’re done.
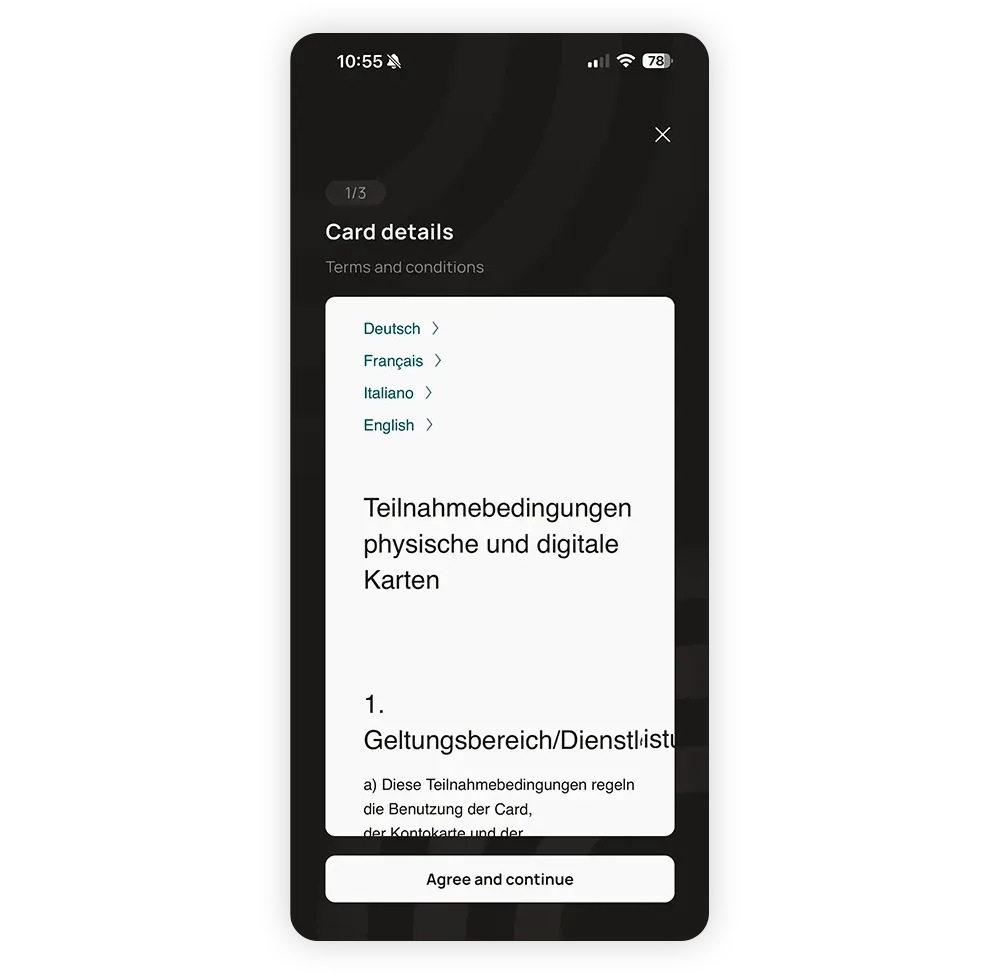
1.3
They will be shown the terms and conditions of their bank. If they agree, tap Agree and continue.
1.3
We are now encrypting the card data and sending it to the Smart Chip.
Tap Next, then Scan.
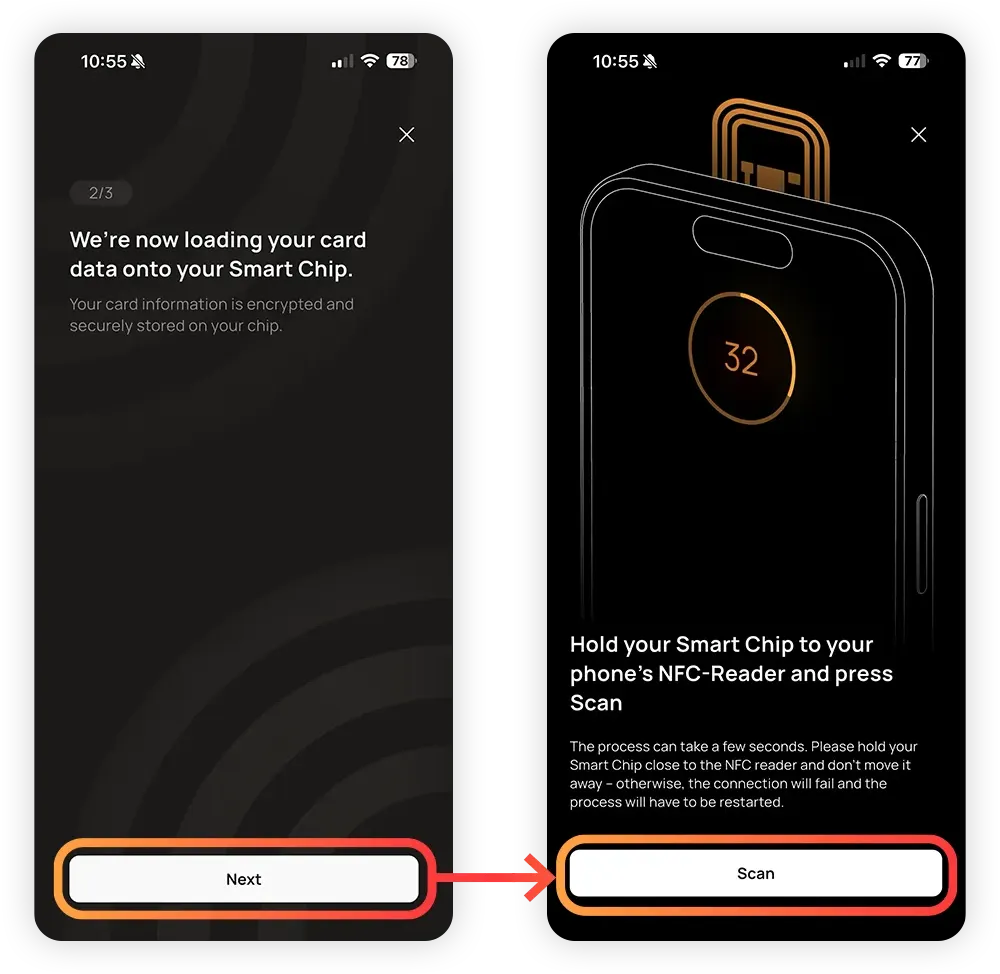
1.3
This process works exactly like the initial activation of the Smart Chip. The only difference is that it takes longer.
Hold the Smart Chip to the NFC reader of the smartphone until the process begins.
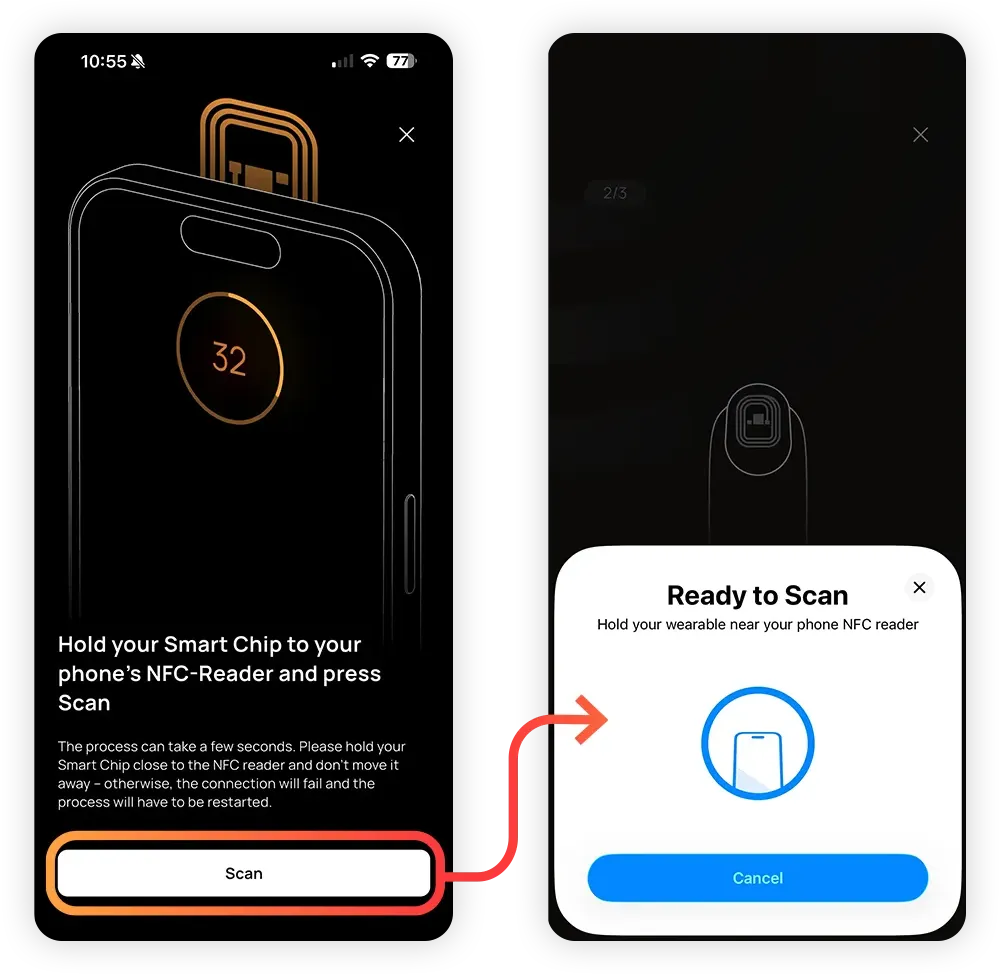
1.3
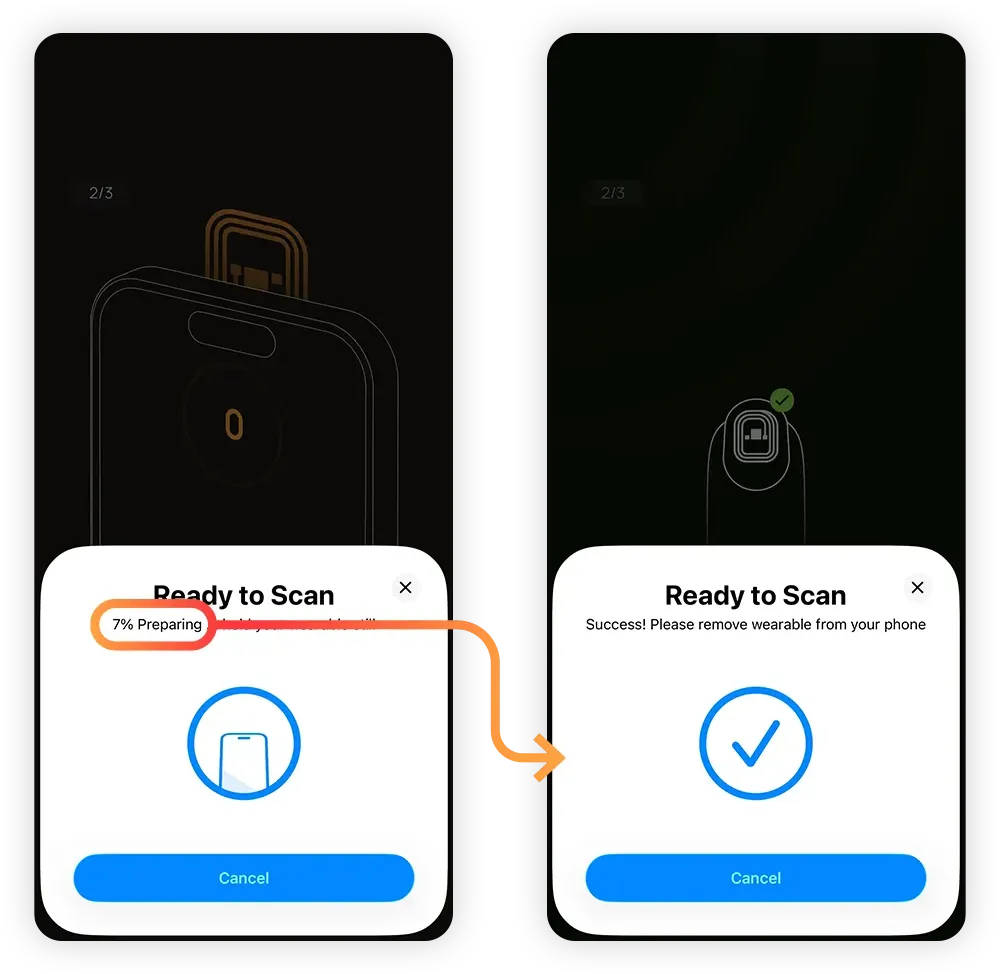
As soon as the process starts, do not move the Smart Chip!
The data is now being transferred, which takes a few seconds. If you move the Smart Chip, the connection will break.
Wait until the process is finished.
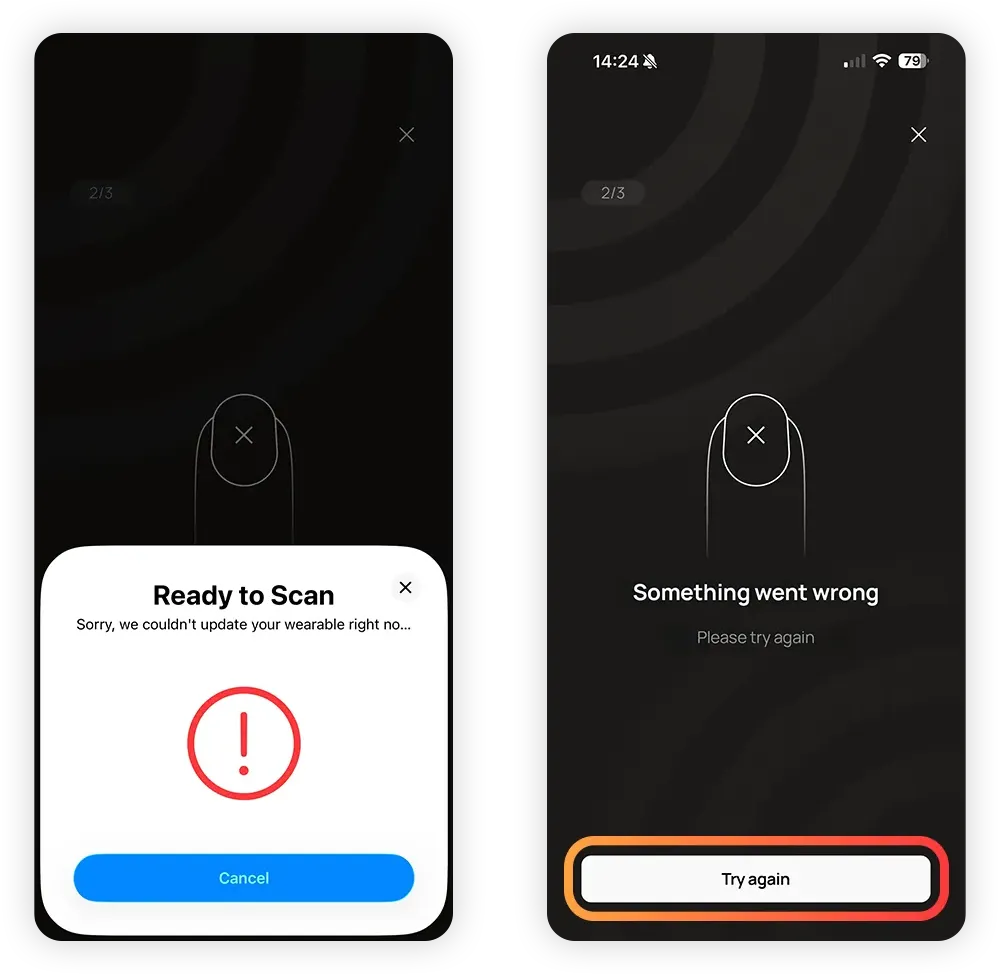
If the process is interrupted, simply tap Try again.
In rare cases, the process may no longer start if it has been interrupted too often. If this happens, completely delete the Smart Chip from the home screen and reconnect it. Then start again from the beginning with the payment card. Make sure you hold the Smart Chip very still against the NFC reader and do not move it as soon as the process starts.
1.3
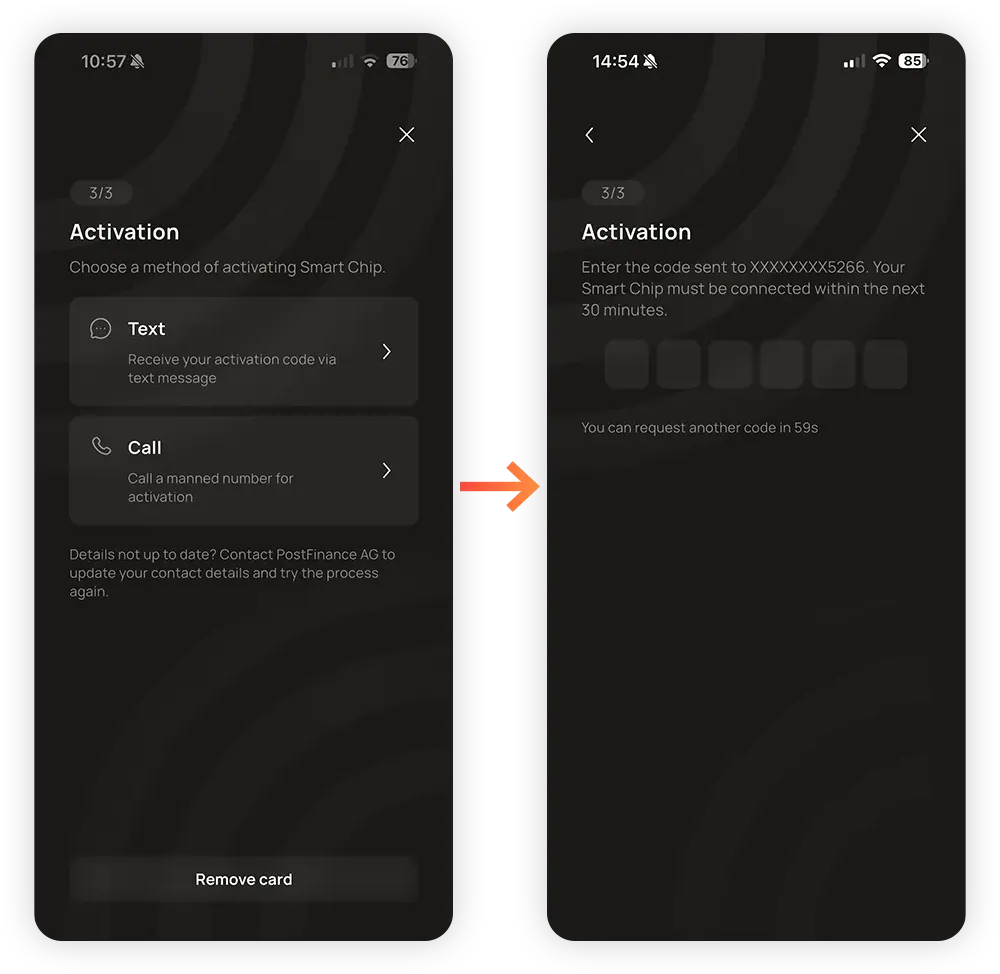
To activate contactless payment with the card, the function must first be approved by the customer’s bank. This is a security feature to prevent misuse of the card.
Depending on the bank, this can be done via SMS code, phone call, or the bank’s app. The Smart Chip app will display all available options and lead you through the process.
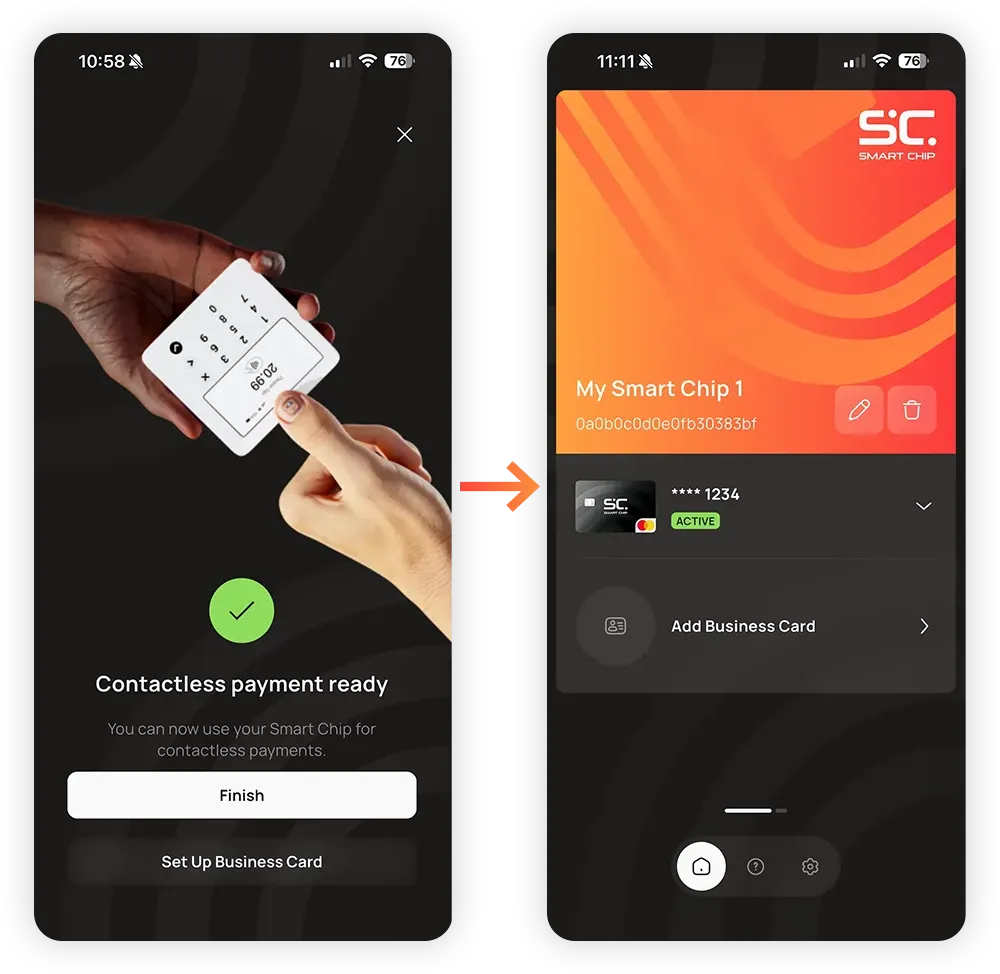
After you have activated the payment card, it is now connected and the Smart Chip is ready for contactless payment.
You can now tap Finish to get back to the home screen or Set up Business Card to go on to the business card function.
1.3
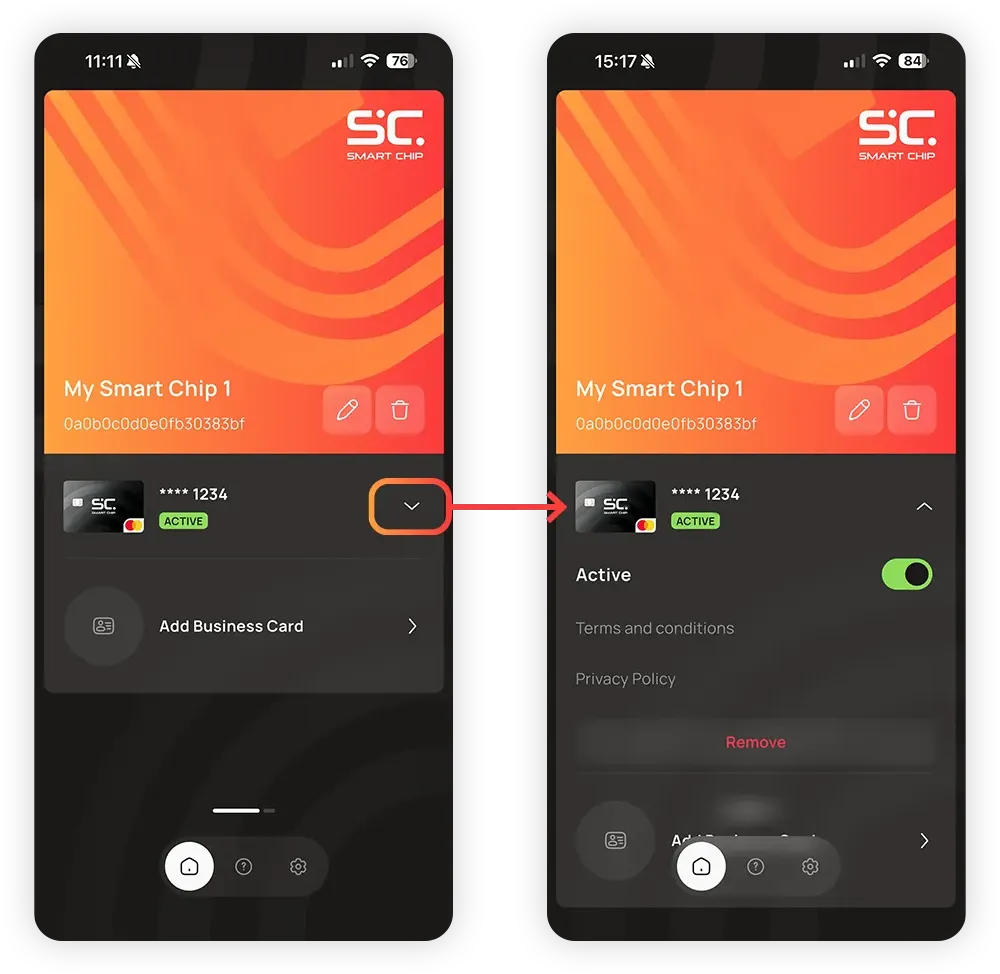
The payment card is shown on the home screen. Show the customer that tapping the arrow opens the card and shows a few options:
Active: The slider can be used to temporarily deactivate the card.
Remove: This completely removes the card from the Smart Chip. It or another card can be added again at any time.
1.4
Adding a business card to the Smart Chip allows for fast, easy sharing of contact details, like the name, phone number, email, business information and Social Media accounts.
Customers don’t have to fill out everything; just what they want to share.
Tip:
Demonstrate this feature using your own Smart Chip on the customer’s phone. This allows them to see how it works, and you can share your business contact details at the same time!
1.4
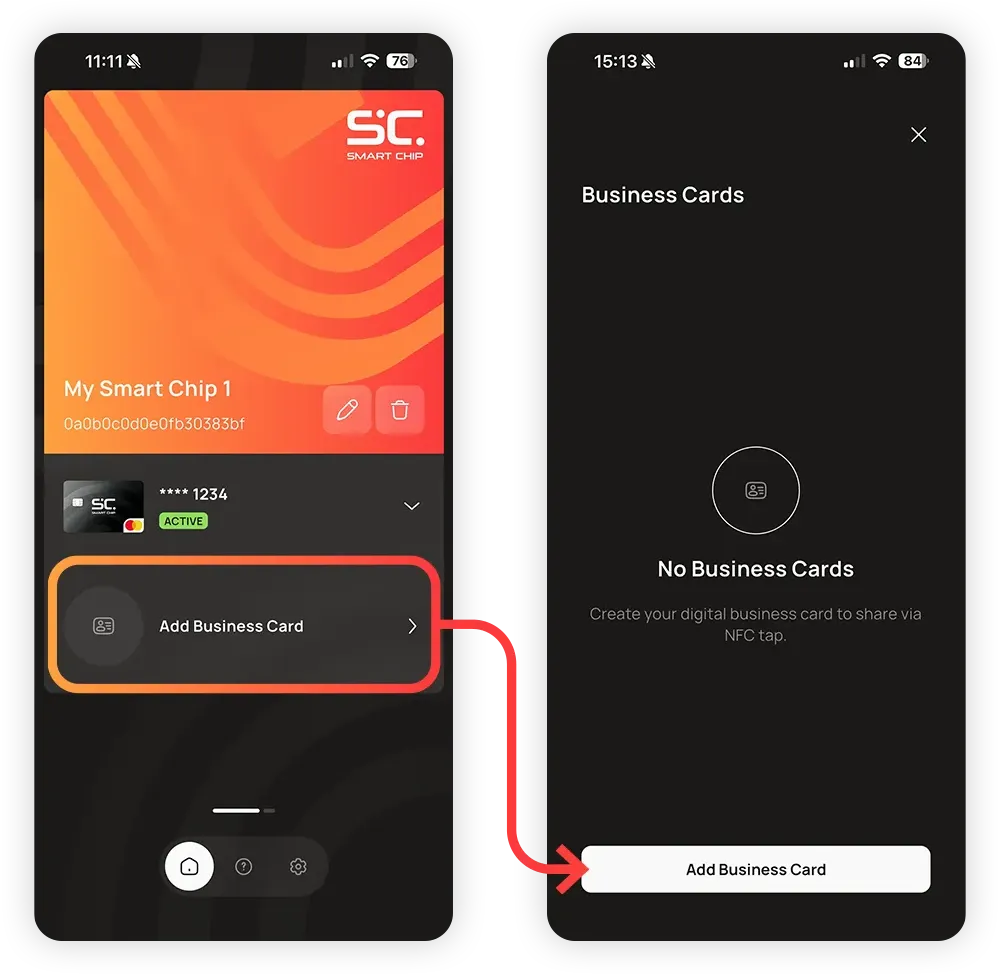
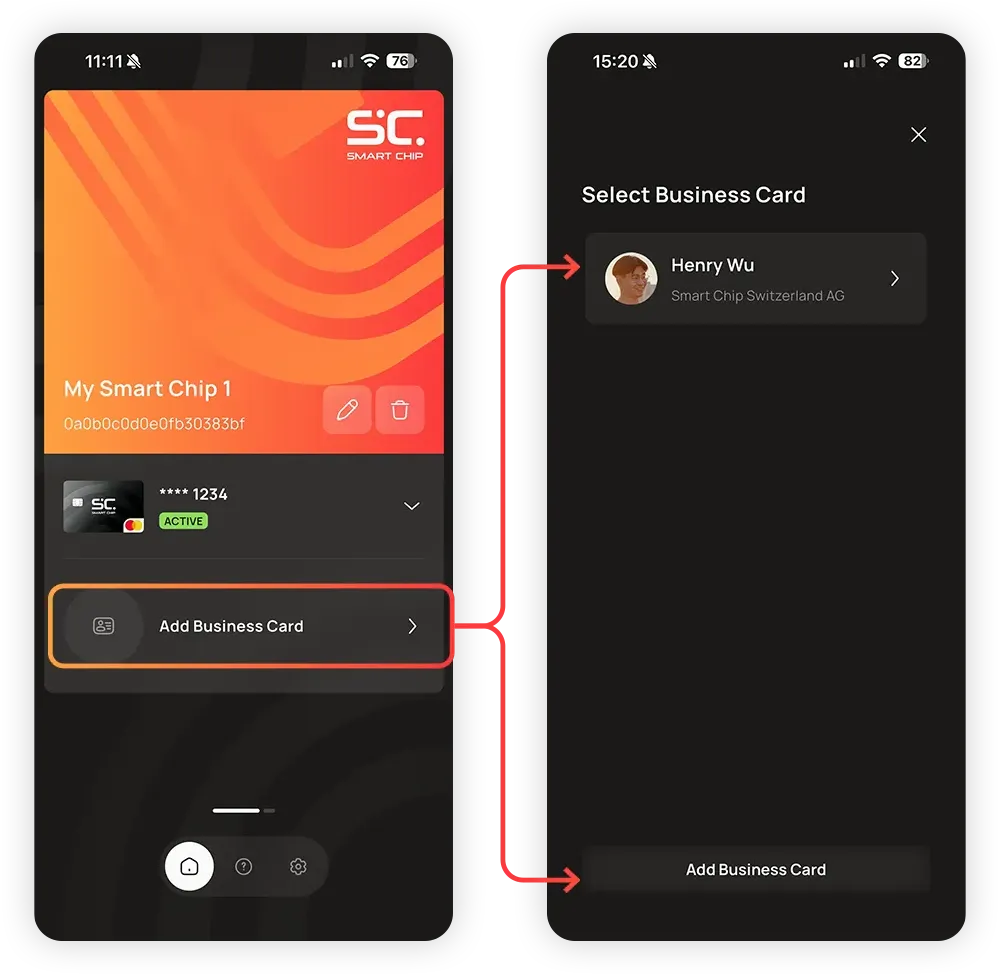
Tap Add Business Card on the home screen.
You will see a list of previously added business cards. Tap Add Business Card to create a new one.
1.4
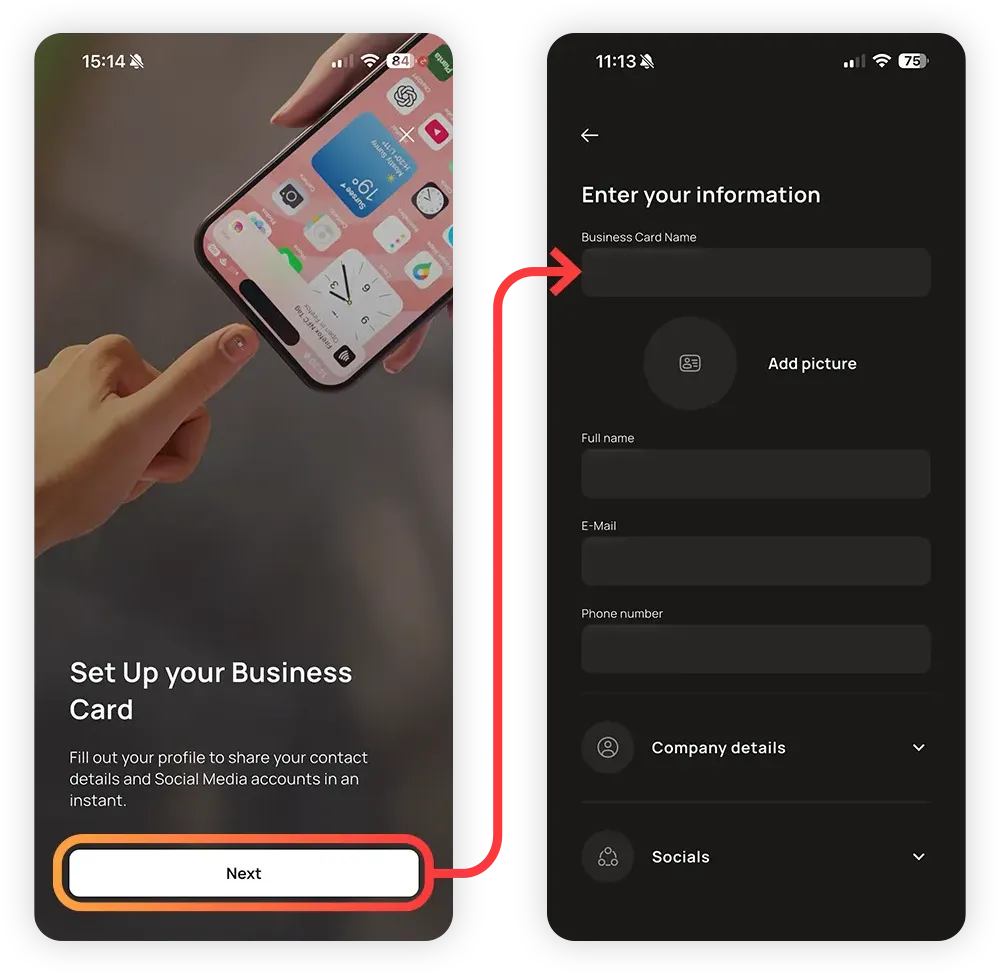
Tap Next to get to the business card.
1.4
Customers can fill in as much (or as little) information as they want here. It’s entirely up to them how much they want to share.
Important: after filling in the form, they must scroll down and tap Save, otherwise the information will be lost.
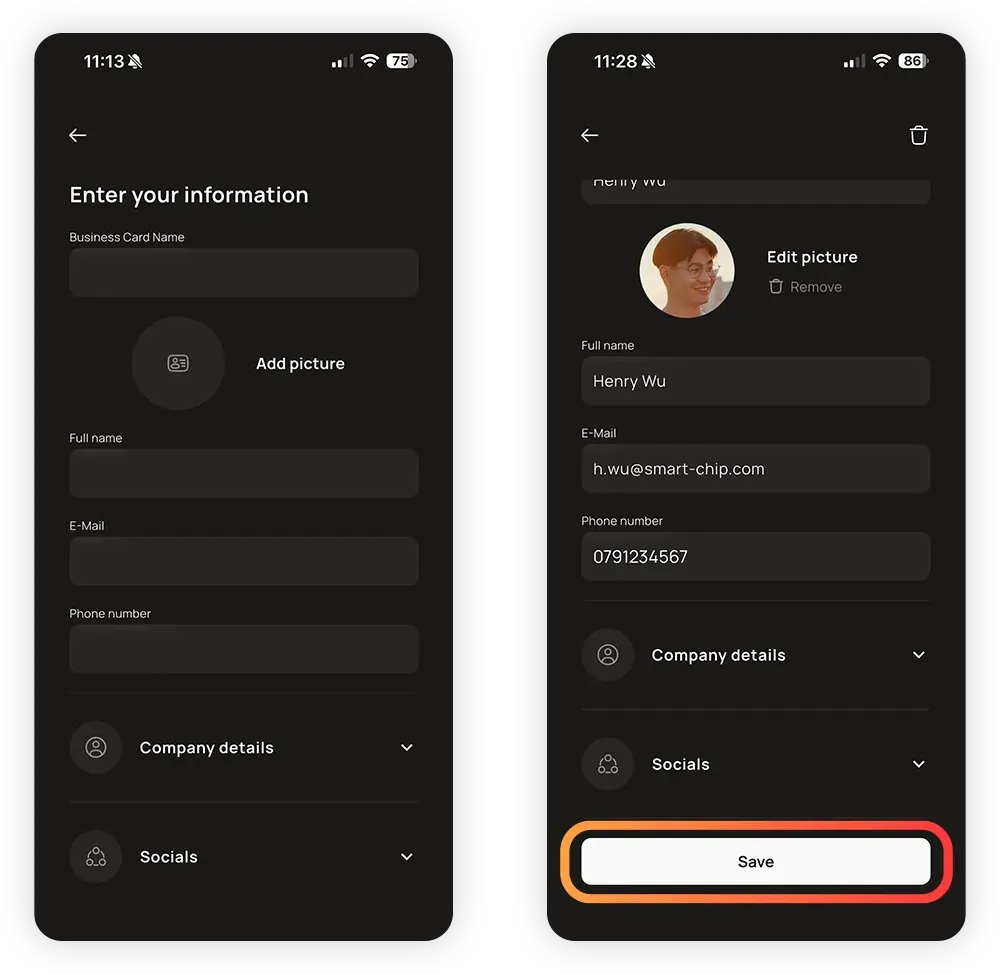
The business card is now active on the Smart Chip and ready to share.
It works by simply holding the finger to the NFC reader of a phone.
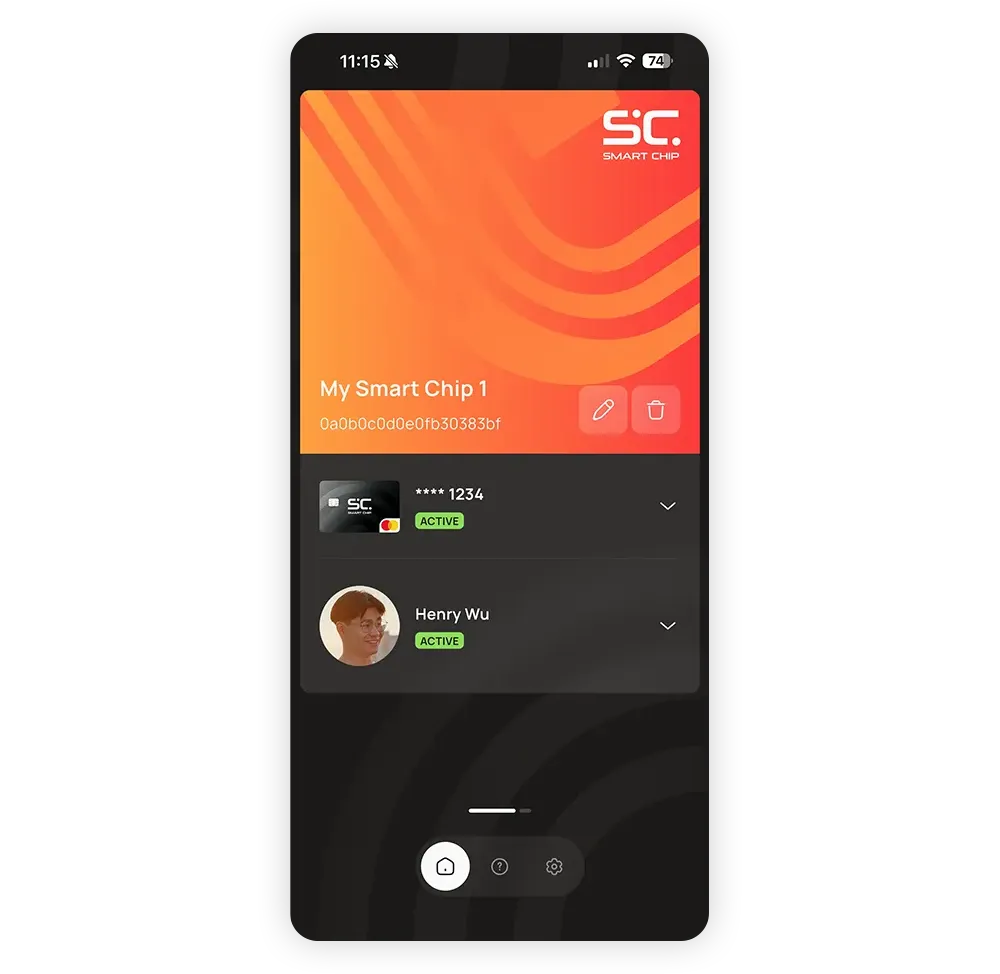
1.4
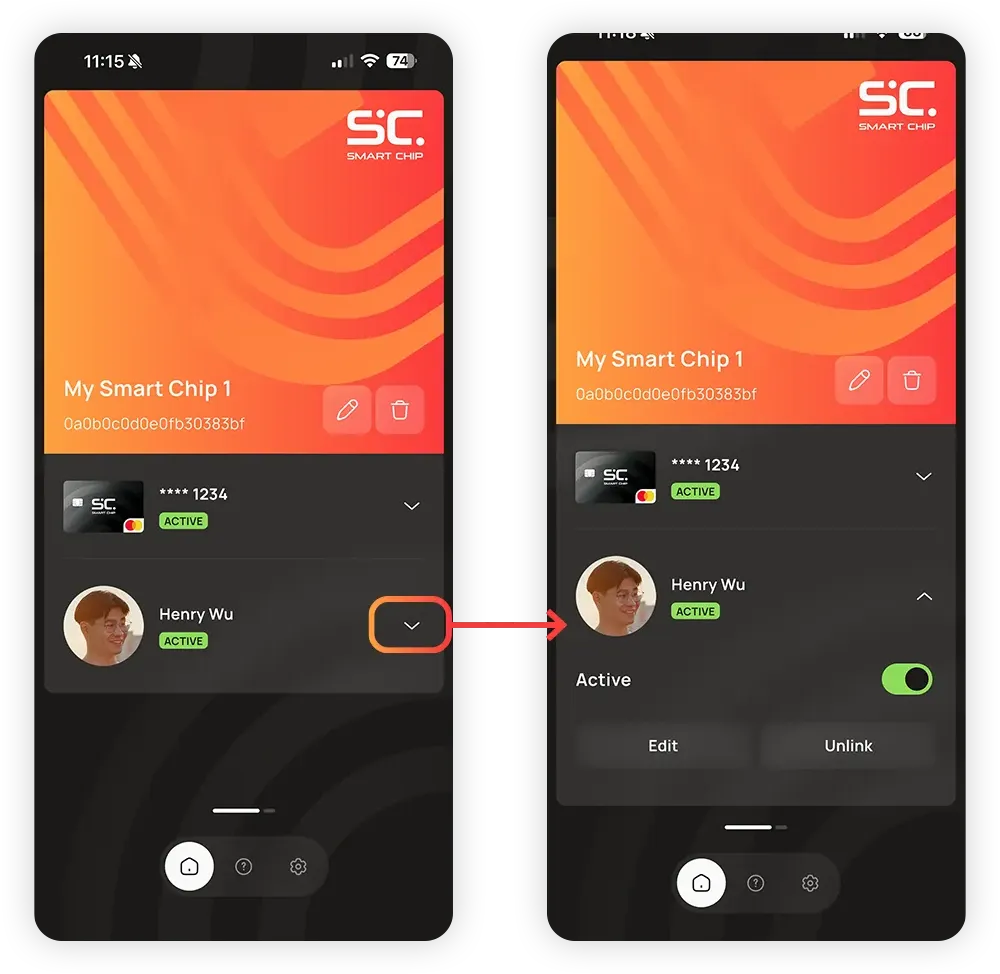
Like the payment card, the active business card is shown on the home screen. Tap the arrow for more settings:
Active: Here, the business card can be temporarily deactivated.
Edit: To change, add, or delete individual entries on the active card.
Unlink: This disconnects the business card from the Smart Chip. The business card or another card can be reconnected at any time.
1.4
When the business card is disconnected, the business card field on the home screen will be empty again. If you tap Add Business Card, you will return to the list of business cards. Here you can select an existing one or create a new one with Add Business Card.
This is useful if, for example, a customer wants to have a professional and a personal business card.
1.5
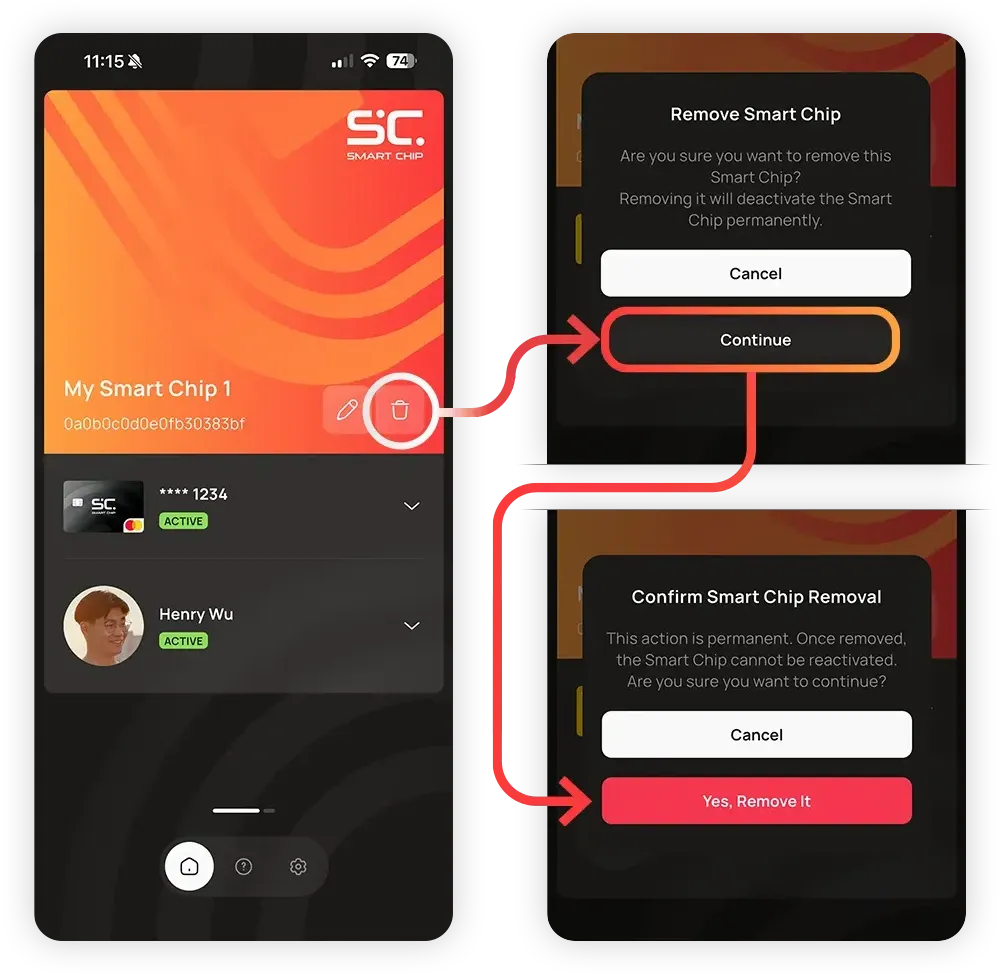
If the Smart Chip is replaced or the customer no longer wants one, it must be deleted and removed from the account.
When you remove an old Smart Chip and attach a new one, be sure to delete the old chip from the app.
Tap the recycle bin icon to delete the Smart Chip from the account.
Note:
The text indicates that a deleted Smart Chip cannot be reactivated. This is intended as a warning to prevent accidental deletion.
Technically speaking, a Smart Chip can be added back to the same account without any problems. However, all payment cards must be set up again from scratch.
If problems arise with a Smart Chip, deleting and re-adding it can be a useful first step in troubleshooting. After re-adding it, check whether the problem still exists. Many problems can be solved by first doing this.
 English English
  Deutsch
 Español
 Français
 Italiano
 Português
 Čeština
 Polski
 Svenska